Click the Allocations menu link to open the Allocate Labor screen.
Alternatively, hover a mouse pointer over the Allocations menu link to display its drop-down menu.
Slide a mouse pointer over to the Allocations to display its menu.
Click Labor Hours to display the Allocate Labor screen.
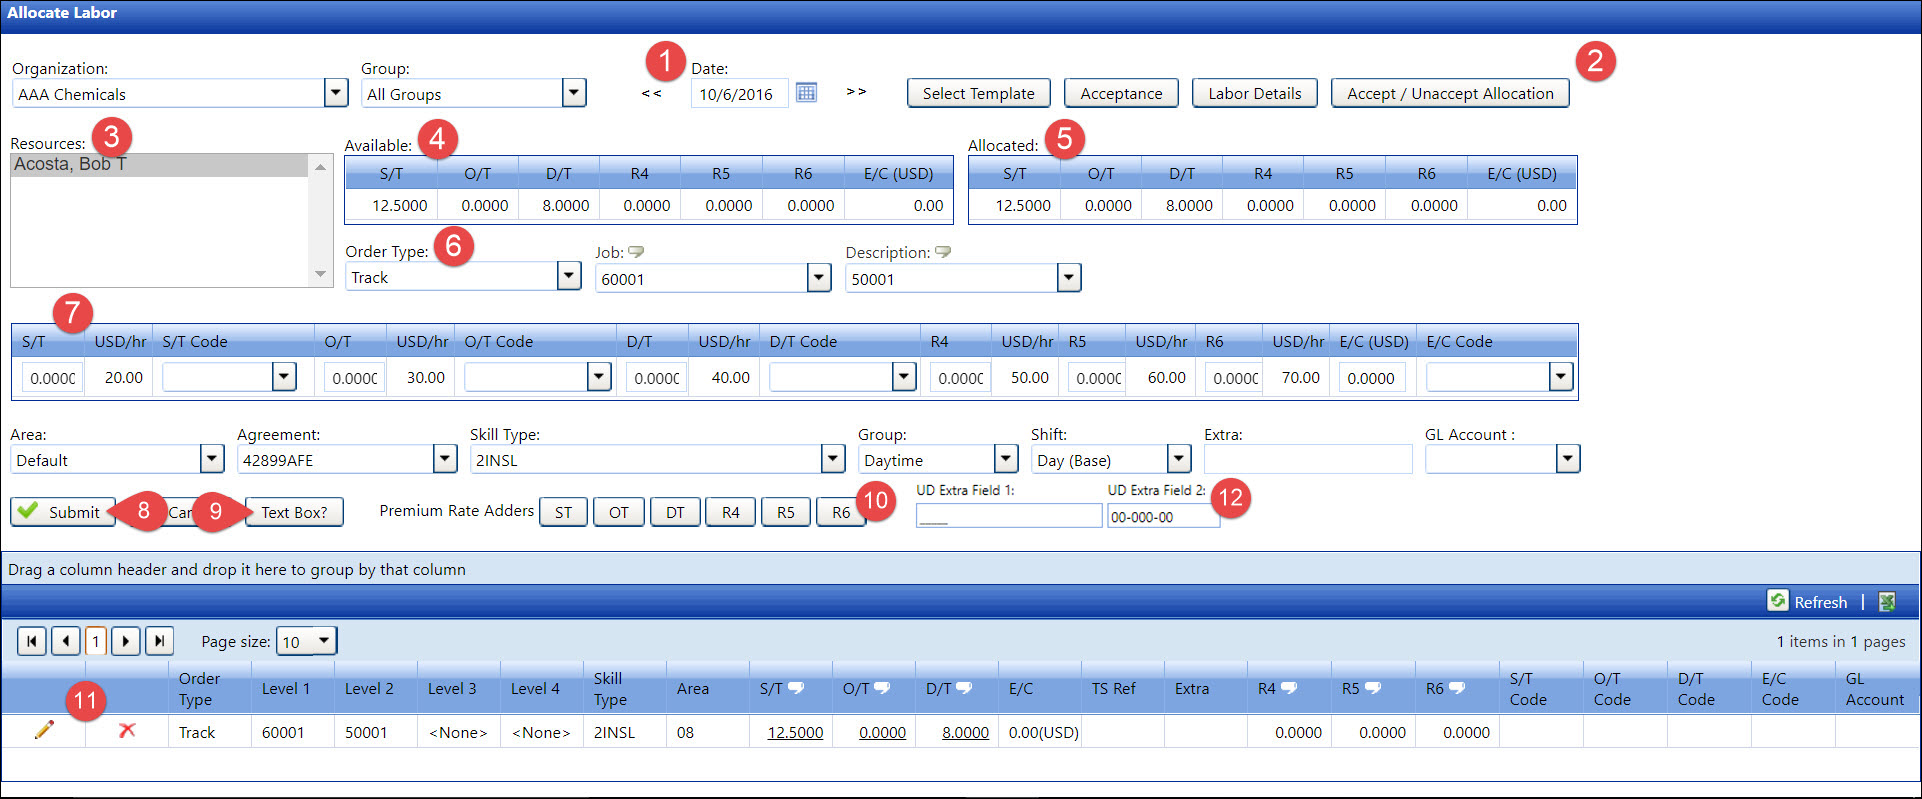
Timesheet date
Allocate Labor screen buttons
Clicking the Select Template button will open the Templates screen. Refer to Templates for more information
Clicking the Acceptance button will open the Accept Labor Hours/Costs screen. Refer to Accept Labor Hours and Costs for more information.
Clicking the Labor Details button will open the Labor Details screen. Refer to Overrides of Labor Hours and Extra Charges for more information.
Click the Accept/Unaccept Allocation button to quickly accept or unaccept the available allocated hours and other costs. This feature is useful when adjusting rejected allocations since it allows the user to go to the one screen, Allocate Labor screen, and correct the rejected allocation instead of going back and forth between Accept Labor Hours/Costs screen and Allocate Labor screens to complete the process.
The labor resources with the hours and extra charges display in the Resources list box, depending on the selected timesheet date
Available grid displays the available hours and extra charges that are ready for allocation.
Allocated grid displays the allocated hours and extra charges.
Cost objects area where cost objects are entered manually into the text boxes or select from the drop-down lists. Refer to Show Descriptions for Cost Objects feature for more information on how to enable or disable this feature.
The available number of hours and amount of extra charges enter into the hours and extra charges text boxes, ready to be allocated.
Click the Submit button to process the allocation.
Click the Text Box? or Drop Down List? button to enable the cost objects text boxes or drop-down lists.
Premium Rate Adders buttons are displayed if the Premium Rate Adders checkbox is selected on the Application Settings screen. Refer to Application Settings for more information.
Grid displays the detailed hours and extra charges that were allocated.
If the Show Allocation Page Extra Fields setting is enabled, then the two additional Extra Fields are displayed. The field names are user-defined according to the business practice. Refer to Show Allocation Page Extra Fields for more information on how to enable and disable the setting.
If applicable, select a location from the Location drop-down list located at the menu bar.
From the Allocate Labor screen, select an organization from the Organization drop-down list.
The All Group option in the Group drop-down list is selected by default. Select a specific labor group from the Group drop-down list.
Enter the date into the Date text box to display the labor resources with available hours and extra charges. Alternatively, select a date from the calendar. (see also Date Format)
Click a labor resource name from the Resources list box to display the selected labor resource's hours and extra charges that have not been allocated in the Available grid.
After selecting a labor resource with the labor hours and extra charges, the next process is to allocate those hours and extra charges. The cost objects are displayed as text boxes by default. Before continuing with the allocations, click the Drop Down List? button to enable the cost objects as a drop-down list. Otherwise, proceed with the allocations. The following instruction uses the cost objects as text boxes.
If the ST/OT/DT code is required for labor allocation feature is enabled, an activity code must be selected from the S/T Code, O/T Code, or D/T Code drop-down list. Refer to Enable or disable the ST/OT/DT code is required for labor allocation feature for more information.
If the skill qualifications function is enabled, then the Skill Type drop-down list will be limited to only the skills from the labor resource's skill qualifications. Refer to Skill Qualifications for more information.
If the subcontract feature is used, enter the pre-approval approved numbers into the Level 2 text box. Refer to Subcontract for more information.
Ensure the correct cost objects are selected according to the defined Geo Cost Object Level on the Location Settings screen. Refer to Enable or disable the Use of Boundaries feature for more information.
From the Allocate Labor screen, select an order type from the Order Type drop-down list.
Enter cost object information into the appropriate text boxes.
Enter the available straight time into the S/T text box then select its straight time code from the S/T Code drop-down list.
Enter the available overtime into the O/T text box then select its overtime code from the O/T Code drop-down list.
Enter the available double-time into the D/T text box then select its double-time code from the D/T Code drop-down list.
If applicable, enter the information into the R4, R5, and R6 text boxes.
Enter the available extra charges into the E/C (USD) text box then select its extra charges code from the E/C Code drop-down list.
Make the changes, if applicable, to the selection for the Area, Agreement, Skill Type, Group, Shift, and GL Account drop-down lists.
Enter additional information, up to 50 characters, into the Extra text box or leave the text box empty.
Click the Submit button to allocate and display the allocation of the selected labor resource in the grid. Hours and costs that have not been allocated are displayed in the Available grid. Hours and costs that have been allocated are displayed in the Allocated grid.
Accepted allocations are displayed in different colors, and the Edit and Delete icons are disabled. The work order information is a read-only field. Once an allocation is submitted, it cannot be edited. The allocation must be deleted then reallocated.
From the grid, click the Edit icon on a line item to display the work order information and to enable the S/T, O/T, D/T, E/C, R4, R5, and R6 text boxes. The Area, Agreement, Skill Type, Group, Shift, and GL Account drop-down lists are also enabled.
Make the changes then click the Update icon to save and display the modifications in the grid.
From the grid, click the Delete icon on a line item. The delete confirmation pop-up message appears.
Click OK to delete the selected allocation.
If the hours are related to subcontract, select SUB-CONTRACT from the Order Type drop-down list.
Select <None> from the Level 1 drop-down list.
Select the assigned pre-approval number from the Level
2 drop-down list.
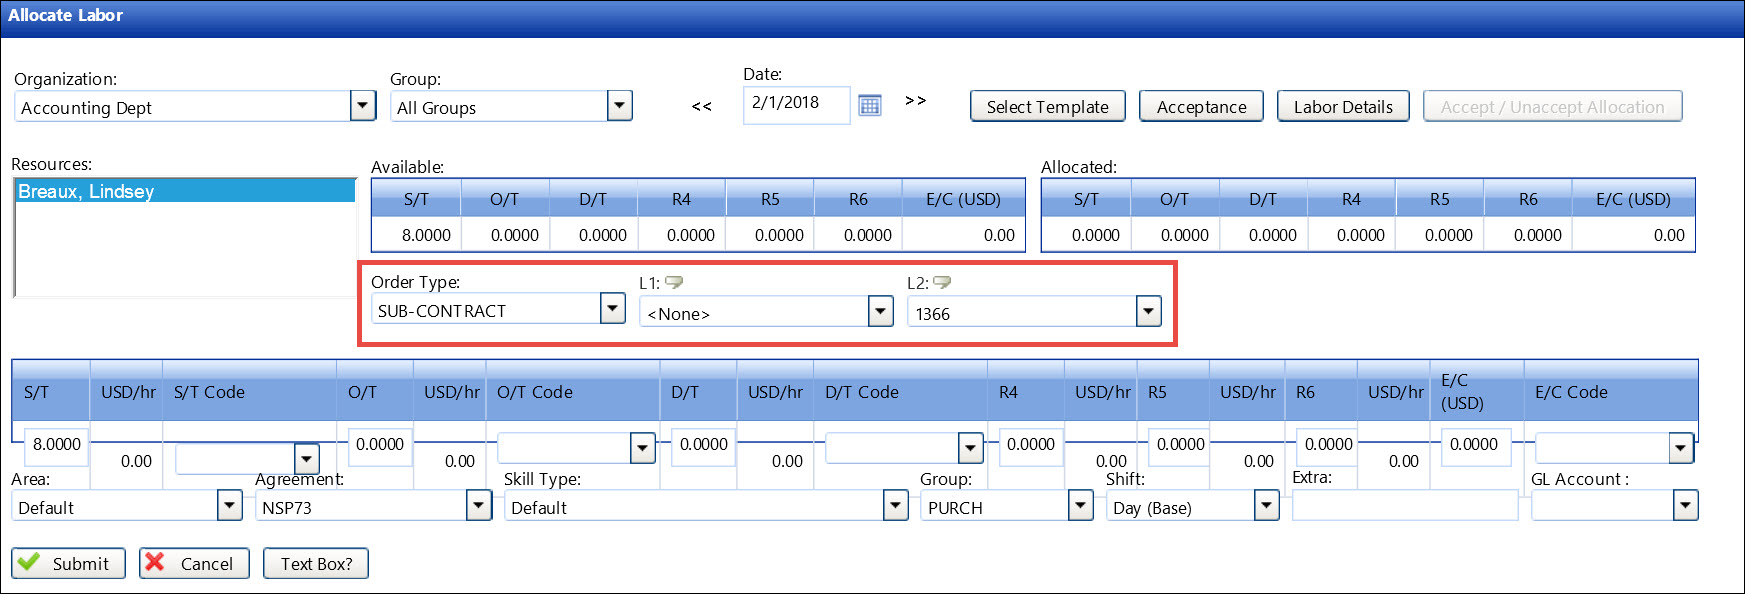
Refer to Allocate labor hours and/or extra costs to allocate the hours accordingly.