The overrides are completed in the Labor Details screen. If the labor resource has a pay formula that is calculating overtime based on the cumulative hours for the week, remember to recalculate all the time for the rest of the week after adding an hour override. For example, during the day on Thursday, an override is performed for Monday's hours. The hours that were calculated on Tuesday and Wednesday were based on the original calculation of Monday hours, not the hours after the override. Correct the cumulative hours for the week by recalculating Tuesday and Wednesday's hours. When the labor badges out on Thursday, then the calculation for the week will automatically be corrected.
Click the Activity menu link to open the Labor Hours screen.
If applicable, select a location from the Location drop-down list.
From the Labor Hours screen, enter a date or a date range into the From and To text boxes. Alternatively, select the dates from the calendars. (see also Date Format)
Selecting a labor resource's event from the Labor Listing.
If a date is selected, select a labor resource to highlight the line item.
Click the Labor Details link to open the Labor Details screen.
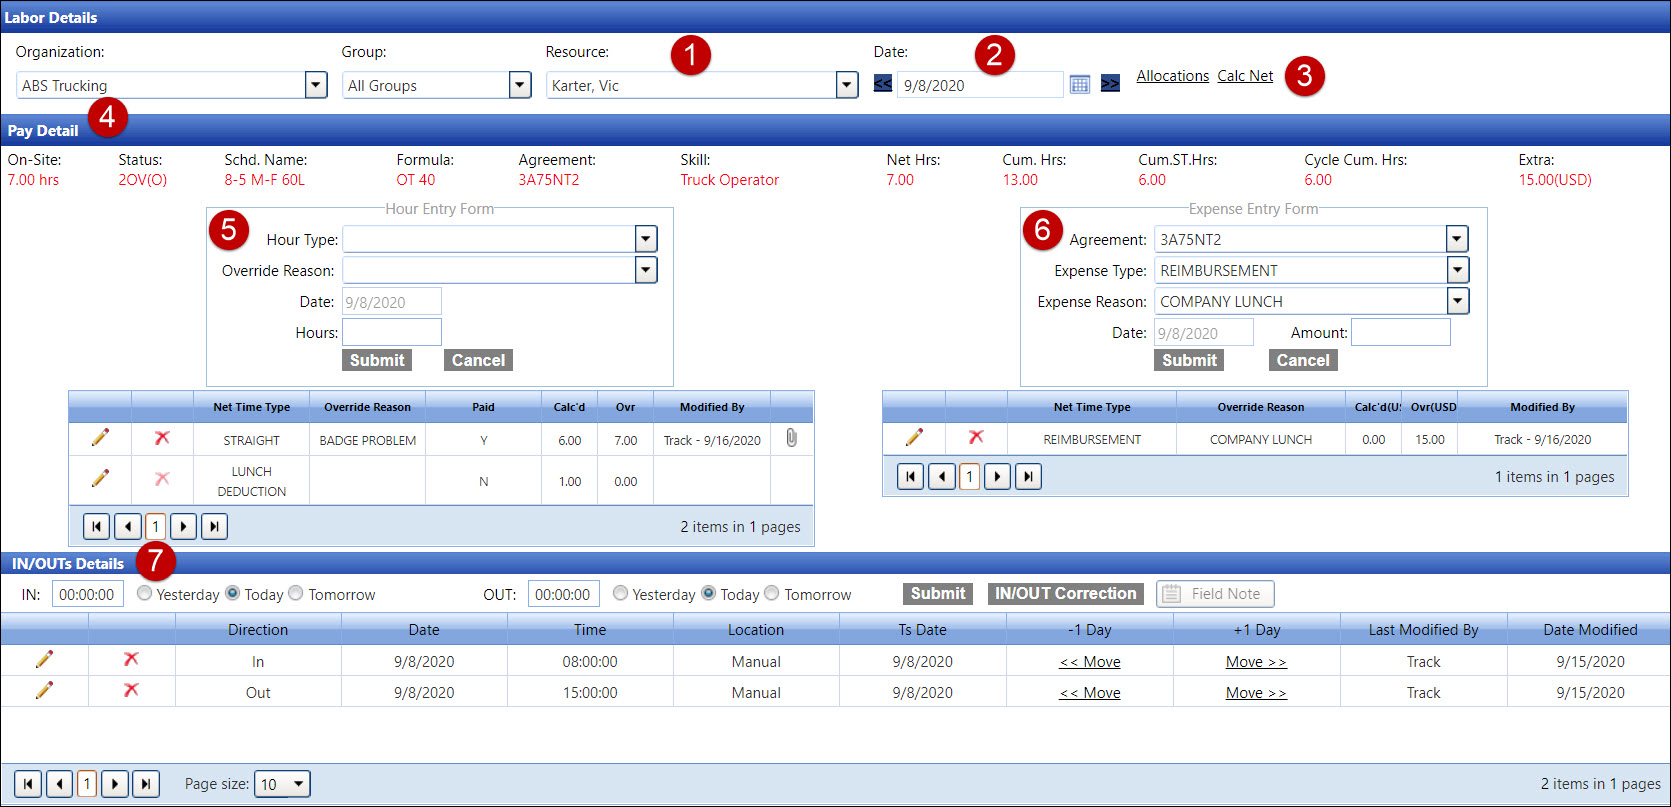
Selected labor resource name is displayed in the Resource drop-down list. If applicable, select another labor resource's name from the Resource drop-down list.
Selected date is displayed in the Date text box. Click the Previous or the Next icon to display the pay details for the previous or next day.
Clicking the Allocations
link will open the Allocate Labor screen, displaying the selected
labor's pay details that may be ready for allocations.
Click Calc Net to recalculate
the selected labor resource's hours.
Pay Detail area displays the on-site hours, status, schedule name, pay formula, agreement, skill, net hours, cumulative hours, cumulative straight hours, cycle cumulative hours, and extra charges.
Enter the override hours
in Hour Entry Form.
If an override request has been approved with an override attachment,
the Attachment icon ![]() displays
at the override line item.
displays
at the override line item.
Enter the override extra charges in Expense Entry Form.
IN/OUTs Details grid displays the listing of IN and OUT time
of the selected date. The IN or OUT time is manually entered into
the IN or OUT text boxes to correct an event.
If Virtual Gate is used, click the Field
Note button to view the field note information.
From the Hour Entry Form, select an hour type from the Hour Type drop-down list.
Select an override reason from the Override Reason drop-down list.
The Date text box is read-only, displaying the selected override date.
Enter the number of hours into the Hours text box.
Click the Submit button to save and display the override hour in the grid.
From the Expense Entry Form, select an agreement from the Agreement drop-down list.
Select an expense type from the Expense Type drop-down list.
Enter the expense reason into the Expense Reason text box.
The Date text box is read-only, displaying the selected override date.
Enter the amount of the expense into the Amount text box.
Click the Submit button to save and display the override extra charges in the grid.
From the Labor Details screen, click the Delete icon on a line item in the grid located at the Hour Entry Form or Expense Entry Form. The delete confirmation pop-up message appears.
Click OK to delete the selected override.
Related Topics