Understand Track Screen
Controls
Track has additional features for the users
to manage or organize their work.
Checkbox
If the screen has a record listing, the checkbox
may be displayed on each row or line item. Click the checkbox to select
the line item, indicating with a checkmark inside the selected checkbox.
Click the checkbox with the checkmark to deselect it, indicating an empty
checkbox. If the checkbox is located at the column header, then the user
may click this checkbox to select or deselect all checkboxes that are
displayed on the page.
Edit, Update, Cancel, and Delete icons
The icons' images and colors may have different
appearances, depending on the selected Theme. However, each icon's functionality
remains the same.
At the grid area, click the Edit
icon  to enable the
text boxes and/or drop-down list for modifications.
to enable the
text boxes and/or drop-down list for modifications.
After the users make the necessary
changes, click the Update or Insert
icon  to save
and display the modified records.
to save
and display the modified records.
After the Edit icon is selected,
the Cancel icon  or
or  appears next to
the Update icon. Clicking the Cancel icon will refresh
the screen or reopen the previous screen without saving any information.
appears next to
the Update icon. Clicking the Cancel icon will refresh
the screen or reopen the previous screen without saving any information.
Click the Delete icon  to delete a selected item.
Expand icon
The Expand icon's image and color may have
different appearances, depending on the selected theme. For the Outlook
theme, the Expand icon  is a triangle. For Default, Black, or Sunset theme, the Expand icon
  is a chevron. If the groups of records appear
on the grid, they are displayed as line items and in a collapsing state.
The Expand icon displays on each line item.
is a chevron. If the groups of records appear
on the grid, they are displayed as line items and in a collapsing state.
The Expand icon displays on each line item.
The Expand icon in the collapsing
state or appears
to point to the right of the grid. Click the Expand icon to
open a line item.
The Expand icon in the expanding state
 or
or  appears to point down.
Click the Expand icon to close a line item.
appears to point down.
Click the Expand icon to close a line item.
Export to Excel
Track has a feature to export records to Excel
spreadsheets. The Export to Excel icon appears at the top right corner
of the grid.
Select the records to export to Excel
by displaying the records on the screen.
Click the Export to Excel icon
 . The pop-up message
appears.
. The pop-up message
appears.
Select the Open, Save,
or Cancel option accordingly.
Filter option
The Filter option is used to sort through
the large quantity of records and display records according to the search
criteria. Entries in the filter text boxes are not case sensitive.
Enter the search criteria into the
appropriate text box.
Click the Filter icon  to display the pop-up menu.
Select a filter option to display
the records according to the selected options.
Click the No Filter option
from the Filter pop-up menu to clear a text box, refresh the data,
and display the available records.
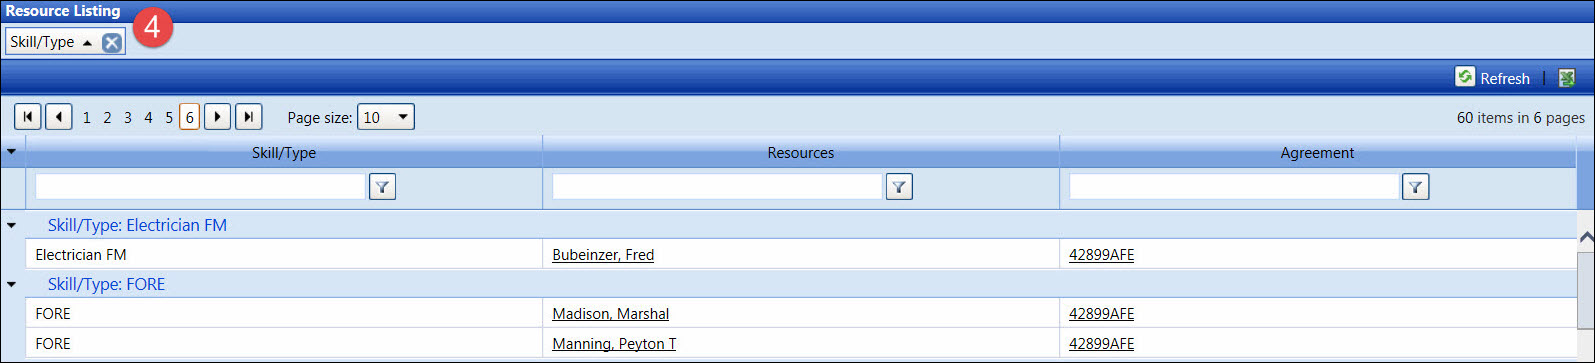
Group
Items by Column Header
Track has a feature that groups records by
one or more column headers.
From the grid area, press and hold
a mouse pointer on a column header.
Drag and drop it on to the area noted,
"Drag a column header and drop it here to group by that column."
The screen refreshes, and the records in the grid are grouped by a
selected column header.
Repeat the steps to group records
by another column header.
The Sort and Cancel icons display
in the column header button.
Location drop-down list

The Location drop-down list is located at
the menu bar. Select a location from the Location drop-down list
to switch between the locations of the company setup.
Persistence Framework
Once a user selects the options from the drop-down
list or enters the values into the text box, the persistence framework
remembers the following grid settings after a user logs out of Track.
Columns filter, including the filter
value and filter option.
Columns sorting by ascending or descending
order.
Columns grouping, including the pre-selected
sorting option.
Group items by the column headers.
Columns reordering in the grid.
Pre-selected page size option.
Refresh data in the grid area
The refresh icon is located on the top right
corner of the grid. Click the Refresh icon  to refresh the grid, clear the checkboxes and the text boxes, and/or return
to the default drop-down lists.
to refresh the grid, clear the checkboxes and the text boxes, and/or return
to the default drop-down lists.
Refresh a screen
There are two different methods to refresh
the entire screen. Refreshing the screen will clear the entries in the
text boxes that are on the screen.
Click the Refresh icon at the
URL or address bar to refresh the entire screen.
Alternatively, right-click anywhere
on the screen to display a pop-up menu.
Select Refresh to refresh the
entire screen.
Reset link
Depending on a screen, the reset feature will
clear entries in the text boxes or return to the default options in the
drop-down lists. Click the Reset link to clear, refresh, or return
to the default entry or selection.
Resize

Hover a mouse pointer over the line
between the column headers until the double arrow appears and the
pop-up message displays, "Drag to resize."
Press and hold down the mouse then
drag the line to the left or right to resize the columns
Reorder Columns
Press and hold a mouse over a column
header.
Drag and drop the selected column
to a new location.
Restore Default
On the Labor Hours screen, click the Restore Default icon  located at the top right corner of the grid. The grid will restore the
original settings.
located at the top right corner of the grid. The grid will restore the
original settings.
Sort by Column Header
The records for each column can be sorted
by clicking the column header.
Clicking
the column header initially will sort the records in the ascending
order and the ascending icon is
displayed next to the column header name  .
.
Click
the column header again to sort records in the descending order and
display the descending icon next to the column header name  .
.
The
records return to their natural state when the records are not sorted.
Theme drop-down list

The Theme drop-down list is located at the
menu bar. Select a theme from the Theme drop-down list to select
a color scheme that applies to Track screens. Even though the icons' images
and colors may have different appearances, each icon's functionality remains
the same.
Tool-tip icon
If the tool-tip icon  is displayed on a screen, hover the mouse pointer over it to display additional
information.
is displayed on a screen, hover the mouse pointer over it to display additional
information.
View by
Page icons and Page Size drop-down list

The View by Page icons and the Page Size drop-down
list are displayed above or below the listing. The page size feature displays
the number of records per page. Depending on the screen, there are options
to select 10, 20, 50, 100, or 250 records to display per page.
Click the First Page icon  to display the records
on the first page.
to display the records
on the first page.
Click the Previous Page icon
 to display the
records on the previous page.
to display the
records on the previous page.
Click the Next Page icon  to display the records
on the next page.
to display the records
on the next page.
Click the Last Page icon  to display the records
on the last page.
to display the records
on the last page.
Click the page number to go to the
selected page.
The number of records and pages are
located at the top right corner of the grid. Select the number from
the Page Size drop-down list to display the selected number
of records per page.
 to sort the records in
ascending or descending order.
to sort the records in
ascending or descending order. to ungroup the records.