Hover a mouse pointer on the Settings menu on the menu bar to display its drop-down menu.
Slide the mouse pointer over the Configuration option to display the menu.
Click Application
Settings to open the Application
Settings screen.
Hover a mouse pointer on the Settings menu on the menu bar to display its drop-down menu.
Slide the mouse pointer over the Configuration option to display the menu.
Click Application
Settings to open the Application
Settings screen.
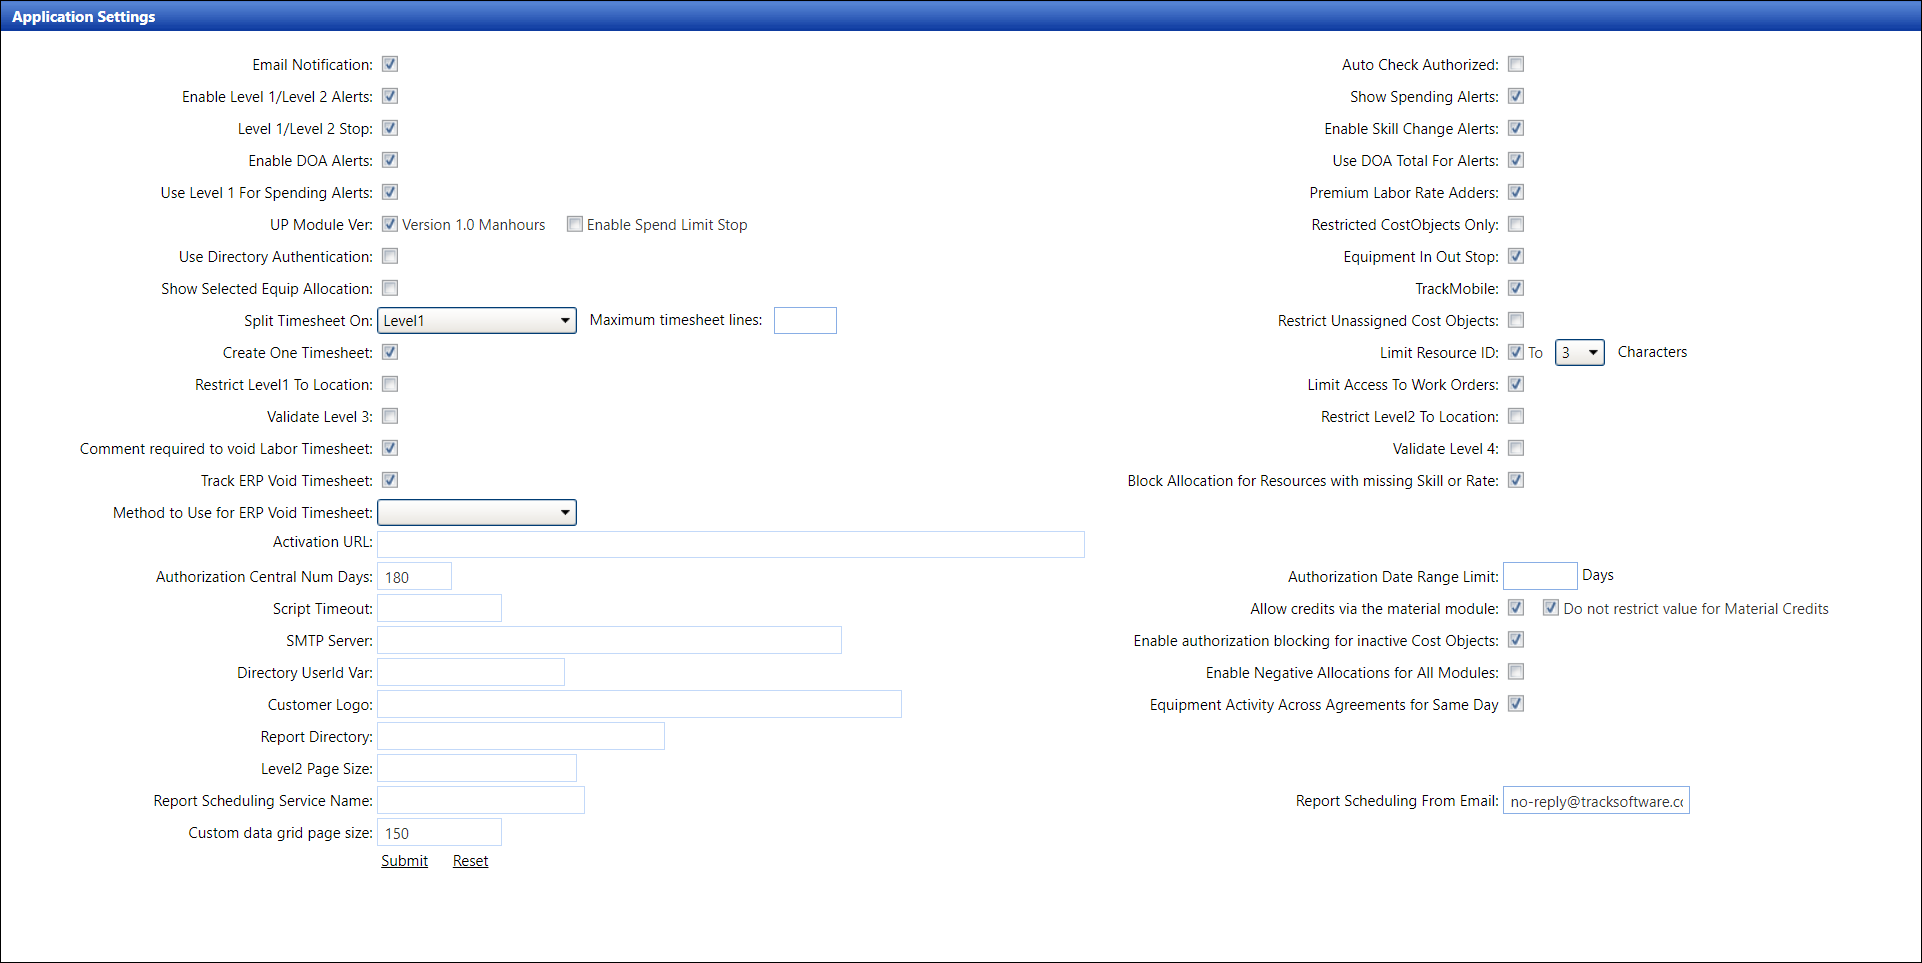
Select or deselect the checkboxes or the options from the drop-down lists.
Enter or delete the information in the text boxes.
Click Submit to accept the application settings.
Click Reset to return to the default setting. Reset functionality is only available to reset the drop-down lists and text boxes.
Option |
Description and Instruction |
Email Notification |
Click the Email Notification checkbox to enable or disable Track internal messages to be forwarded to a preferred e-mail account. Enter SMTP (Simple Mail Transfer Protocol) into the SMTP Server text box. |
Enable Level 1/Level 2 Alerts |
Click the Enable Level 1/Level 2 Alerts checkbox to enable the highlighted alert on a line item on the Authorization Central screen when the Level 1 or Level 2 (default alert) cost object has exceeded cost estimate specified. |
Level 1/Level 2 Stop |
Click the Level 1/Level 2 Stop checkbox to disables the Auth checkbox on the Authorization Central screen when the Level 1 or Level 2 cost object allocated cost has exceeded the cost estimate specified, preventing authorization of that line item. |
Enable DOA Alerts |
Click the Enable DOA Alerts checkbox to enable the DOA (delegation of authority) alert when DOA spending limit may be exceeded. |
Use Level 1 For Spending Alerts |
Click the Use Level 1 For Spending Alerts checkbox to enable the highlighted alert on Level 1 instead of Level 2 on the Authorization Central screen. |
UP Module Ver (Version 1.0 Manhours) |
If the UP Module Ver checkbox is selected, then the Version 1.0 Manhours module has been installed and enabled. If the checkbox is deselected, the UP Module is enabled. |
Use Directory Authentication |
Click the Use Directory Authentication checkbox to utilize directory authentication with a single sign-on when logging into Track. Enter the user ID into the Directory User ID Ver text box. This functionality is available for users who have Track on premises and is unavailable for hosted users. |
Show Selected Equip Allocation |
Click the Show Selected Equip Allocation checkbox to display allocation detail for only the selected equipment on the Allocations screen. If the checkbox is deselected, all allocations are automatically displayed at the bottom of the screen. |
Split Timesheet On |
Select Level 1 or Level 2 from the Split Timesheet On drop-down list to split timesheets on cost object Level 1 or Level 2. Alternatively, selecting the No option from the drop-down list will not split the timesheets on the cost object levels. |
Create One Timesheet |
Click the Create One Timesheet checkbox to enable the capability to create one combined timesheet with all allocation types (Labor, Equipment, and Material) in the Authorization Central screen. |
Restrict Level1 To Location |
Click the Restrict Level 1 to Location checkbox to restrict the use of Level 1 cost objects to a specific Location which requires the assignment of Plant Codes to Level 1 and Location. |
Validate Level 3 |
Check box to ensure timesheet date is within the L3 start/end dates and that the L3 is in active status. |
Comment required to void Labor Timesheet |
Click the Comment required to void Labor Timesheet checkbox to enable the user to add a reason for voiding a timesheet. |
Track ERP Void Timesheet |
Click the Track ERP Void Timesheet checkbox so that Track can communicate with client ERP system. This feature determines if a timesheet has not been processed in ERP system so that a timesheet can be voided in Track. For this setting to work properly, the option from the Method to use for ERP Void Timesheet drop-down list must be selected. |
Activation URL |
Enter the URL in the Activation URL text box to assign the URL location for SAP timesheet posting. |
Authorization Central Num Days |
Enter a number into the Authorization Central Num Days text box to enable the number of days for the Authorization default "look back" period. |
Script Timeout |
Enter a number in seconds into the Script Timeout text box to determine the database connectivity timeout. |
SMTP Server |
Enter the external simple mail transfer protocol server name into the SMTP Server text box in order for the Email Notification option to work properly. |
Directory UserId Var |
Enter a user ID into the Directory UserId Var text box to determine a default user ID for active directory authentication. This functionality is used in conjunction with the Use Directory Authentication checkbox. |
Customer Logo |
Enter a directory with a file name of a desired customer logo image into the Customer Logo text box to display the logo on the top right corner of Track. |
Report Directory |
If not using the Track default folder, enter the specific directory or folder that contains the Crystal Reports into the Report Directory text box. This setup is used in the Reporting section. |
Level2 Page Size |
Enter a number into the Level2 Page Size text box to determine the number of entries that display in the drop-down list during allocation of Level 2 cost objects. |
Report Scheduling Service Name |
Enter the report scheduling service name into the Report Scheduling Service Name text box. |
Auto Check Authorized |
While viewing the authorization detail in the Authorization Central screen, click the Auto Check Authorized checkbox to select all line items. |
Custom data grid page size |
Enter a number into the Custom data grid page size text box to customize the number of records displayed per page. |
Show Spending Alerts |
Check the Show Spending Alerts checkbox to enable the display of cost spending for Level 1 or Level 2 cost objects on each line item on the Authorization Central screen. If the Use Level 1 for Spending Alerts checkbox is selected, then the cost spending will be displayed in Level 1. |
Enable Skill Change Alerts |
Click the Enable Skill Change Alerts checkbox to enable the highlighting alert of skill code changes made during the allocation process. |
Use DOA Total For Alerts |
Click the Use DOA Total For Alerts checkbox to utilize the delegation of authority totals to alert the spending limits instead of Level 1 or Level 2 cost estimate. |
Premium Labor Rate Adders |
Enable the Premium Labor Rate Adders function. |
Restricted CostObjects Only |
Restricts cost objects is available in Track prior version 6.2. This setting works in conjunction with Limit Access to Cost Objects. |
Equipment In Out Stop |
Click the Equipment In Out Stop checkbox to stop the input of prior days’ IN/OUT activity for equipment using the Equipment Rate Option (“Weekly Base/Over Rate”) and Method 1 (“Input Week/Monthly Rate”). |
TrackMobile |
Click the TrackMobile checkbox to enable Track Mobile. |
Restrict Unassigned Cost Objects |
Click the Restrict Unassigned Cost Objects checkbox to restrict unassigned cost objects. |
Limit Resource ID, Characters |
Click the Limit Resource ID checkbox and select the number of characters from the Characters drop-down list to limit characters used when assigning a resource ID. |
Limit Access To Work Orders |
Click the Limit Access To Work Orders checkbox to restrict access of cost objects to a specific organization only. Enable this option to use the Restrict Level 1-4 options in Settings/Global Values. |
Restrict Level2 To Location |
Click the Restrict Level2 To Location checkbox to restrict or limit the use of Level 2 cost objects to a specific Location, which requires the assignment of Plant Codes to Level 2 and Plant Codes to a Location. |
Validate Level 4 |
Check box to ensure timesheet date is within L4 start/end dates and that the L4 is in active status. |
Block Allocation for Resources with missing Skill or Rate |
Click the Block Allocation for Resources with Missing Skill or Rate checkbox to prevent any resource allocation without assigned skill or rates. Deselect the checkbox if the non-billable rate is defined under this skill type. |
Method to Use for ERP Void Timesheet |
Click the Method to Use ERP Void Timesheet drop-down list and select the method to void ERP timesheet. In order for the selected method to work properly, the Track ERP Void Timesheet checkbox must be selected. |
Authorization Date Range Limit |
Enter a number into the Authorization Date Range Limit text box to limit the number of days in the date range when accessing authorization detail. |
Click the Enable authorization blocking for inactive Cost Objects checkbox to enable Track to perform a final review on the cost object status before authorization. |
|
Report Scheduling From Email |
Enter an e-mail address into the Report Scheduling From Email text box to in order to receive scheduled reports. |
The setting enables negative allocations currently for the Equipment module and supports the use of the Track Revoke functionality. |
|
Click the Allow credits via the material module checkbox to enable credits via the Material module. Once this setting is enabled, Track will automatically create the necessary Material Group named Credits, Material Item named Credit Invoice, and Rate structure under the Receipt - Casual Purchase rate option for all active agreements in English.
If the Allow credits via the material module checkbox is deselected, the related English Material Group and Item will be hidden, preventing the users from using this feature. If the setting is enabled once again, any new agreement will automatically retrieve the English Material Group, Material Item, and Rate structure for all new active agreements in English.
NOTE: • The only language where the Material Group, Material Item, and Rate structure is automatically created is in English. • Track will also accept the manual creation of the necessary Group and Item translated to French Canadian. The accepted translation for Material Group named Credits in French Canadian is Credits. The Material Item named Credit Invoice in French Canadian is Facture de crédit. • Credits used in the Material Module will only work with the appropriate Material Group and Material Item combination in English or French Canadian at this time. • The customer’s SAP Interface configurations will need to be updated to enable negative services entries or to post credit memos. This setup must be completed before credits or negative allocations can be successfully utilized. |
|
The setting allows an enterprise to configure if an individual piece of equipment can have activity on two different agreements on the same day. If checked, the setting will enable equipment activity to occur across multiple agreements on the same day and prevent activity from total over 24 hours for a day. If unchecked, it will not allow equipment activity to occur on multiple agreements on the same day. |
|
Custom data grid page size |
Enter a number into the Custom data grid page size text box to customize the number of records displayed per page. |
Click the Do not restrict value for Material Credits checkbox to not restrict the credit compared to the authorized cost on. |