Hover a mouse pointer over the Settings menu link on the menu bar to display its drop-down menu.
Slice a mouse pointer over Enterprise to display its menu.
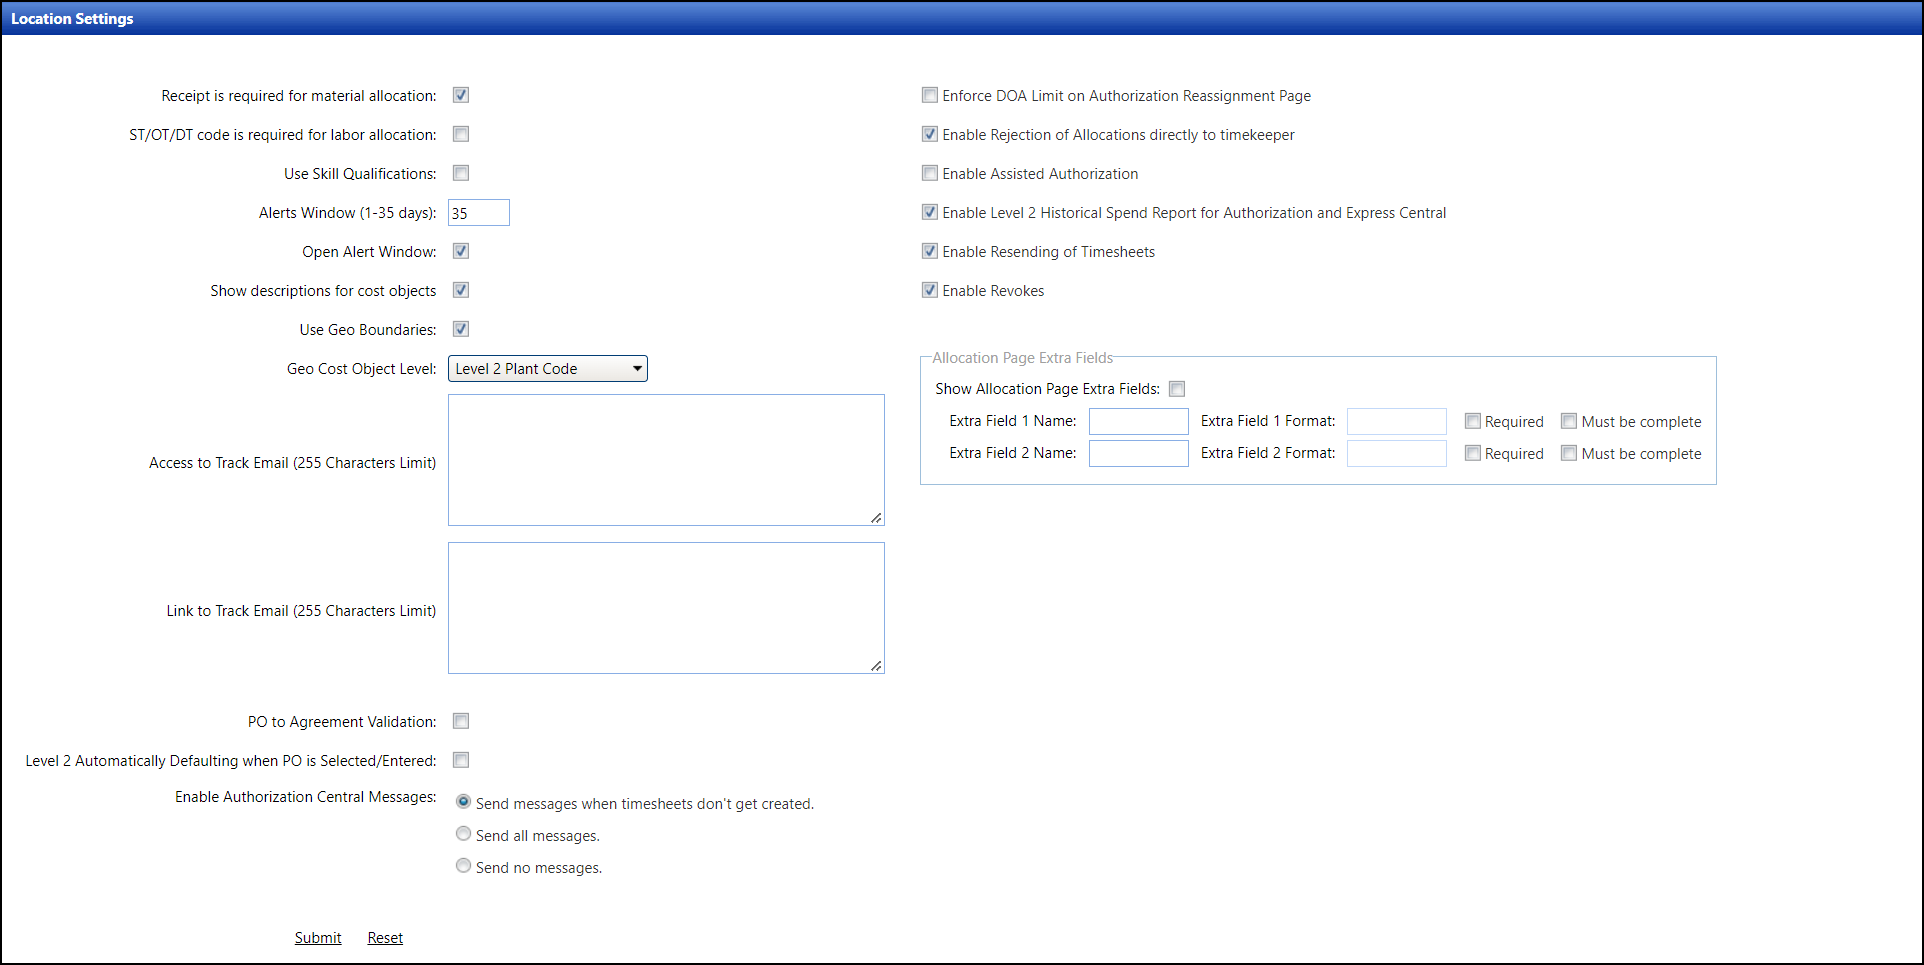
Click Location
Settings to open the Location Settings screen.
Hover a mouse pointer over the Settings menu link on the menu bar to display its drop-down menu.
Slice a mouse pointer over Enterprise to display its menu.
Click Location
Settings to open the Location Settings screen.
From the Location Settings screen, click the Receipt is required for material allocation checkbox to select and turn on the receipt is required for material allocation feature. Otherwise, deselect the Receipt is required for material allocation checkbox to turn off the receipt is required for material allocation feature.
Click Submit to enable or disable the receipt is required for material allocation feature.
If the ST/OT/DT code is required for labor allocation feature is enabled and the user does not select an activity code from S/T Code, O/T Code, or D/T Code drop-down list, then the error message appears, displaying “S/T Code is required”, “O/T Code is required”, or “D/T Code is required”.
The labor allocation imports will also be affected. If the activity code is not supplied in the Allocation import file, then the LogFile will display a message “S/T Code is required”, “O/T Code is required”, or “D/T Code is required”.
From the Location Settings screen, click the ST/OT/DT code is required for labor allocation checkbox to enable the requirement to select an activity code from the S/T Code, O/T Code, or D/T Code drop-down list from the Allocate Labor screen. Otherwise, deselect the ST/OT/DT code is required for labor allocation checkbox to disable the feature.
Click Submit to enable or disable the ST/OT/DT code is required for labor allocation feature.
If the Use Skill Qualifications feature is enabled, it will override the currently assigned labor skills in the agreement with the labor skills. These labor skills are added on the Skill Qualifications screen. Refer to Skill Qualifications for more information.
From the Location Settings screen, click the Use Skill Qualifications checkbox to select and turn on the Use Skill Qualifications feature. Otherwise, deselect the Use Skill Qualifications checkbox to turn off the Use Skill Qualifications feature.
Click Submit to enable or disable the use skill qualifications feature.
The number of days for Track alerts must be 35 or less. If there is no value in the Look back days for Alerts Window text box, then the default setting is 7 days. The alert excludes the Pre-Approval alerts.
From the Location Settings screen, enter the number of days into the Alerts Window text box.
Click Submit to save and enable the number of days for the Track alerts feature. Track alerts are located at the Track's header frame. Refer to Track Main Window for more information.
The purpose for displaying the descriptions for cost objects is to reduce time and minimize errors for the Timekeepers by helping them identify and select the correct cost object during an allocation. If the cost object ID has a description and the Show Descriptions for Cost Objects feature is enabled, Track will display the cost object IDs and descriptions in the cost object drop-down lists. After a cost object ID is selected, its description is displayed under each cost object drop-down list.
If Track screens display only text box accessibility, then enter the cost object ID into the cost object text box to enable the drop-down list and populate cost object listing.
From the Location Settings screen, Click the Show descriptions for cost objects checkbox to enable the display of the cost object ID with its description. Otherwise, deselect the Show descriptions for cost objects checkbox to turn off the feature.
Click Submit to save and enable the Show descriptions for cost objects feature. Refer to Show Descriptions for Cost Objects feature for more information.
Once the Track logins are created, the users will receive an email with the URL link to set up their passwords to access the Track application. After the users set up their passwords, they will receive another email with the URL link to access the Track application.
Enter a message, up to 255 characters, into the Access to Track Email text box. This message will be emailed to the users with the URL link to set up their password.
Enter a message, up to 255 characters, into Link to Track Email text boxes. This message will be emailed to the users with the URL link to access the Track application.
Click Submit to save and enable the message notifications.
The PO to Agreement Validation feature will allow the user to allocate using the agreement that is assigned to the Level 1 ID. Refer to Create a Level One information for more information.
From the Location Settings screen, Click the PO to Agreement Validation checkbox to enable the use of the agreement that is assigned to Level 1 ID.
Click Submit to save and enable the PO to Agreement Validation feature.
The Level 2 Automatically Defaulting when PO is Selected/Entered feature allows the user to populate values in the Level 2, Level 3, or Level 4 when the Level 1 ID is selected during the allocations. This feature is based on the PO Account Assigned entered on the Level 1 screen and only if there are values in the Level 2, Level 3, or Level 4. Refer to Create a Level One information for more information.
From the Location Settings screen, Click the Level 2 Automatically Defaulting when PO is Selected/Entered checkbox to enable the auto population of Level 2, Level 3, or Level 4 when the user enters Level 1 during the allocations.
Click Submit to save and enable the Level 2 Automatically Defaulting when PO is Selected/Entered feature.
As a default, the Authorization Central messages are turned off. To enable these messages, select one of the following options.
Select the Send messages when timesheets don’t get created button to send messages only when the creation of timesheets was unsuccessful after processing.
Select the Send all messages button to send successful and unsuccessful messages after processing.
Select the Send no messages button and the messages will not send after processing. This setting is the default selection.
If the users want to enforce DOA limits during Authorization Reassignment so that a user cannot select an area with less than their DOA limit, then the following option must be selected.
Select the Enforce DOA Limit on Authorization Reassignment Page checkbox to enforce DOA limits during Authorization Reassignment.
If the Enable Assisted Authorization checkbox is selected, the Check all rows without exceptions checkbox is displayed at the Express Central screen.
The allocations, only apply to the Labor module, must include one or more of the following exceptions:
Overrides
Skills change on allocations, which display in yellow line items
PO with insufficient funds, which display with a red box around the checkmark
Rate adders
Out of bounds Geo-Boundaries.
Click the Enable Assisted Authorization checkbox to enable the Check all rows without exceptions checkbox on the Express Central screen.
Click Submit to save the Enable Assisted Authorization setting. Refer to Check All Rows without Exceptions Checkbox for more information on how to use the Enable Assisted Authorization feature.
The Show Allocation Page Extra Fields setting enables two additional extra fields for the labor allocations, allowing up to 15 alphanumeric characters per text box. The additional extra fields are able be configured to meet the organization's business needs. If the Show Allocation Page Extra Fields setting is enabled, the users must enter one of the extra field names with the character format. Refer to Extra Fields for the Allocation Screens for the screens that will display the user-defined Extra Fields if the setting is enabled.
From the Location Settings screen, click the Show Allocation Page Extra Fields checkbox.
Enter an extra field name into the Extra Field 1 Name text box.
The x character defines the number of characters preference. Enter x, up to 50 characters, into the Extra Field 1 Format text box. For example, if the users are allowed up to 5 characters entry, then enter xxxxx into the Extra Field 1 Format text box. Even though the hyphen (-) is considered a character, the hyphen will automatically insert as the users enter the values. However, if the hyphen is used in the character format setting, then the users must enter a hyphen when using the Allocations import template.
Click the Required checkbox if the Extra Field 1 is required at least one character entry before the allocations are submitted.
Click the Must be complete checkbox if the Extra Field 1 is required the exact character format. For example, if the character format is xx-xxx-xx, then the users must enter the value with the xx-xxx-xx format.
Enter an extra field name into the Extra Field 2 Name text box.
The x character defines the number of characters preference. Enter x, up to 50 characters, into the Extra Field 2 Format text box.
Click the Required checkbox if the Extra Field 2 is required at least one character entry. When viewing the Allocate Labor screen, the Extra Field 2 text box will display 0 characters for the character settings.
Click the Must be complete checkbox if the Extra Field 2 is required the exact character format setting.
Click Submit to enable the extra fields for the Allocations screens.
The Enable Rejection of Allocations directly to timekeeper function is used to enable allocation rejections to be directed back to the Vendor Timekeeper when using the Delegation of Authority functionality.
Click the Enable Rejection of Allocations directly to timekeeper checkbox.
Click Submit to enable allocation rejections to be directed back to the Vendor Timekeeper when using the Delegation of Authority functionality.
The Open Alert Window function supports the enablement of Pending Authorization Alerts regardless of the timesheet date of the accepted allocation. Pending Authorization Alerts require the user’s Personal Information page to be set up properly for the alert to be sent.
Click the Open Alert Window checkbox.
Click Submit to enable the Pending Authorization Alerts regardless of the timesheet date of the accepted allocation.
The Enable Resending of Timesheets setting must be enabled at the Location Settings screen in the Track application to reprocess timesheets. Additionally, permission to resend a timesheet, INV.TS: User can Resend Timesheets, must be assigned to any users performing this task. This permission can be added to the users’ pre-defined profile in the TrackAdmin application.
Click the Enable Resending of Timesheets checkbox.
Click Submit to save the changes.
The Enable Revokes must be enabled at the Location Settings screen in the TRACK application to use the Revokes functionality. Additionally, the permission SET.ADM: Revoke Allocation Management must be assigned to any users performing this task. This permission can be added to the users’ pre-defined profile in the TRACKAdmin application.
Click the Enable Revoke checkbox.
Click Submit to save the changes.