Hover a mouse pointer over the Invoices menu to display its drop-down menu.
Slide a mouse pointer over to the Authorization Central to display its menu.
Click Express
Central to open the Authorization Central screen.
Express Central is a new way for Authorizers to perform their authorizations faster. The Authorizers will experience improved performance with no change to the core functionality of Authorization Central. Express Central leverages processing the action of authorization in the background to reduce the time users spend completing Authorizations each day.
Hover a mouse pointer over the Invoices menu to display its drop-down menu.
Slide a mouse pointer over to the Authorization Central to display its menu.
Click Express
Central to open the Authorization Central screen.
If applicable, select a location from the Location drop-down list located at the menu bar.
From the Authorization Central screen, the All Organization option in the Organization drop-down list is selected by default. Select a specific organization from the Organization drop-down list. Otherwise, proceed to the next step.
The All Areas option in the Area ID drop-down list is selected by default. Select a specific area ID from the Area ID drop-down list or select Reviewed for Me or All Reviewed Allocations option to restrict the view to only Reviewed Allocations. Otherwise, proceed to the next step.
Click the checkbox, located between the Area ID drop-down list and the From text box, to enable the From and To text boxes and calendars.
Enter a timesheet date or date range into the From and To text boxes. Alternatively, select the dates from the calendars. (see also Date Format)
The No Filter option in the Filter drop-down list is selected by default. To display only labor, equipment, or material items, click the Filter drop-down list to select Labor, Equipment, or Material option.
Click the View button. The View button changes to the Refresh button. The hours, other costs, or charges that are ready to be authorized display in the Authorization Details grid. The records are grouped by a timesheet date and only display up to thirty days prior the selected From date.
To expand and display all line items, click the Expand all rows checkbox located at the Authorization Detail grid's header.
Alternatively, click the Expand icon to open the selected line item, displaying the hours, other costs, or charges.
Click an organization link to view an agreement's attachment.
Click a checkbox on each line item to select the hours, other costs, or charges to be authorized. Alternatively, click the checkbox, located in the column header, to select all of the line items that display on the selected page.
Click the Authorize button to process the authorization for the selected hours, other costs, and charges.
From the menu bar, select a location from the Location drop-down list located at the menu bar.
From the Authorization Central screen, the All Organization option in the Organization drop-down list is selected by default. Select a specific organization from the Organization drop-down list. Otherwise, proceed to the next step.
The All Areas option in the Area ID drop-down list is selected by default. Select a specific area ID from the Area ID drop-down list. Otherwise, proceed to the next step.
Click the checkbox next, located between the Area ID and the From text box, to enable the From and To text boxes and calendars.
Enter a timesheet date or date range into the From and To text boxes. Alternatively, select the dates from the calendars. (see also Date Format)
The No Filter option in the Filter drop-down list is selected by default. To display only labor, equipment, or material items, click the Filter drop-down list to select Labor, Equipment, or Material option.
Click the View button. The View button changes to the Refresh button. The hours, other costs, or charges that are ready to be authorized display in the Authorization Details grid. The records are grouped by a timesheet date and only display up to thirty days prior the selected From date.
To expand and display all line items, click the Expand all rows checkbox located at the Authorization Detail grid's header.
Alternatively, click the Expand icon to open the selected line item, displaying the hours, other costs, or charges.
Click a checkbox on each line item to select the hours, other costs, or charges to be rejected.
For
each line item, click the Comment
icon ![]() to enable the text box.
to enable the text box.
Enter a reason for rejection on each line item into the Comment text box.
Click the Reject button to reject the selected hours, other costs, and charges. The message displays, "Timesheet(s) rejected successfully." The rejected item and its comment will appear as an internal message and will display on the Track Home screen. They will also appear on the Allocation Detail dialog box. Refer to Resolve Rejected Labor Hours and Costs to resolve the rejections.
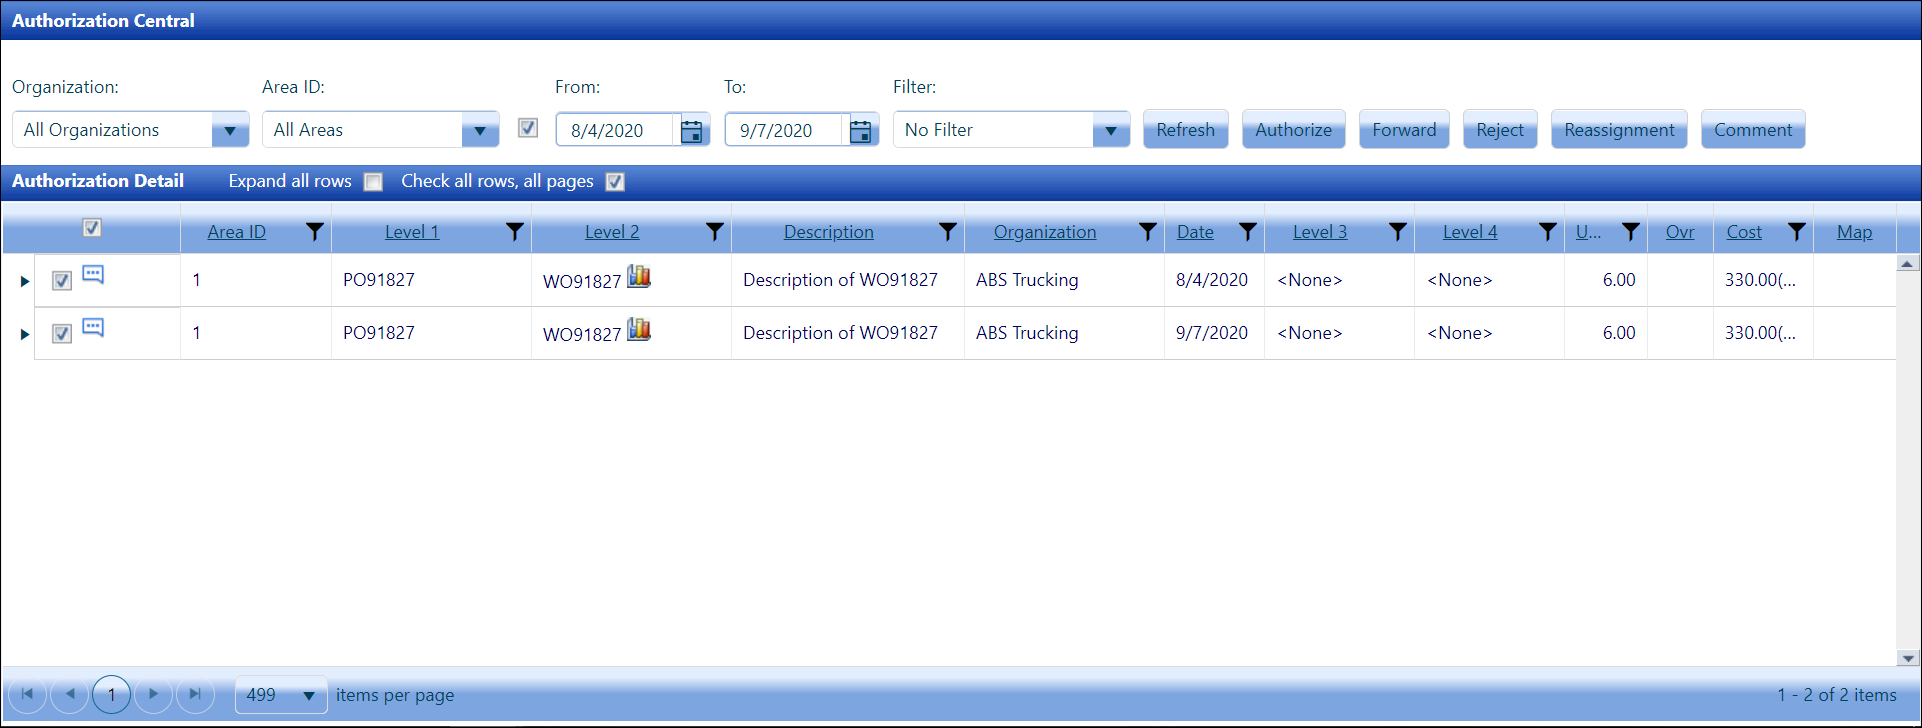
If the Enable Assisted Authorization setting is enabled at the Location Setting screen, the Check all rows without exceptions checkbox is displayed at the Authorization Detail header.
The allocations, only apply to the Labor module, must include one or more of the following exceptions:
Overrides
Skills change on allocations, which display in yellow line items
PO with insufficient funds, which display with a red box around the checkmark
Rate adders
Out of bounds Geo-Boundaries.
Click the Check all rows without exceptions checkbox to select all pending authorizations without exceptions from the Labor, Equipment, and Material modules.
The users, typically the Track Authorizers, can deselect the checkboxes for any of the allocations that need additional review.
Once completed, click the Authorize button to process the authorization for the selected hours and costs.
The Filter option is used to sort through the large quantity of records and display records according to the search criteria. Entries in the filter text boxes are not case sensitive.
Click
one of the Filter icon on
the Column Header to display the dialog box.
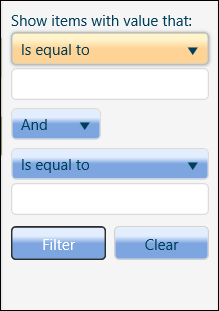
Click the Operator drop-down list and select one of the options.
Enter the search criteria, according to the selected operator option, into the Value text box.
To add additional operator filter, select the And or Or option from the Filter Logic drop-down list.
Click the Additional Operator drop-down list and select one of the options.
Enter the search criteria, according to the selected options, into the Additional Value text box.
Click the Filter button to display the search.
Click the Clear button to clear the search and display the available records.
The users can select the Comment icon ![]() to
enable the text box to enter their notes to save for review at a future
date. If a comment is entered at the summary level, all items included
in that summary will have the same comment. For example, if a comment
is entered at the Cost Object, Labor module, or labor skill level, then
the same comment applies to all labor resources listed within this level.
to
enable the text box to enter their notes to save for review at a future
date. If a comment is entered at the summary level, all items included
in that summary will have the same comment. For example, if a comment
is entered at the Cost Object, Labor module, or labor skill level, then
the same comment applies to all labor resources listed within this level.
From the Authorization Detail grid, click a checkbox on a line item.
Click
the Comment icon ![]() to
enable the text box.
to
enable the text box.
Enter a comment into the Comment text box.
Click the Comment button. The dialog box appears with a message, "Comments Saved."
Click
the Close icon at the top
right corner of the dialog box to close the dialog box and return
to the Authorization Central screen. The Comment icon ![]() is shaded, indicating a comment on a line item is saved.
is shaded, indicating a comment on a line item is saved.
To edit a comment, repeat the steps and update a comment before saving it.
To
view a comment, hover a mouse point over the shaded Comment
icon ![]() to enable the tool-tip,
displaying the comment.
to enable the tool-tip,
displaying the comment.
Refer to Reject hours, other costs, and charges for more information on how to add a reason for rejection.
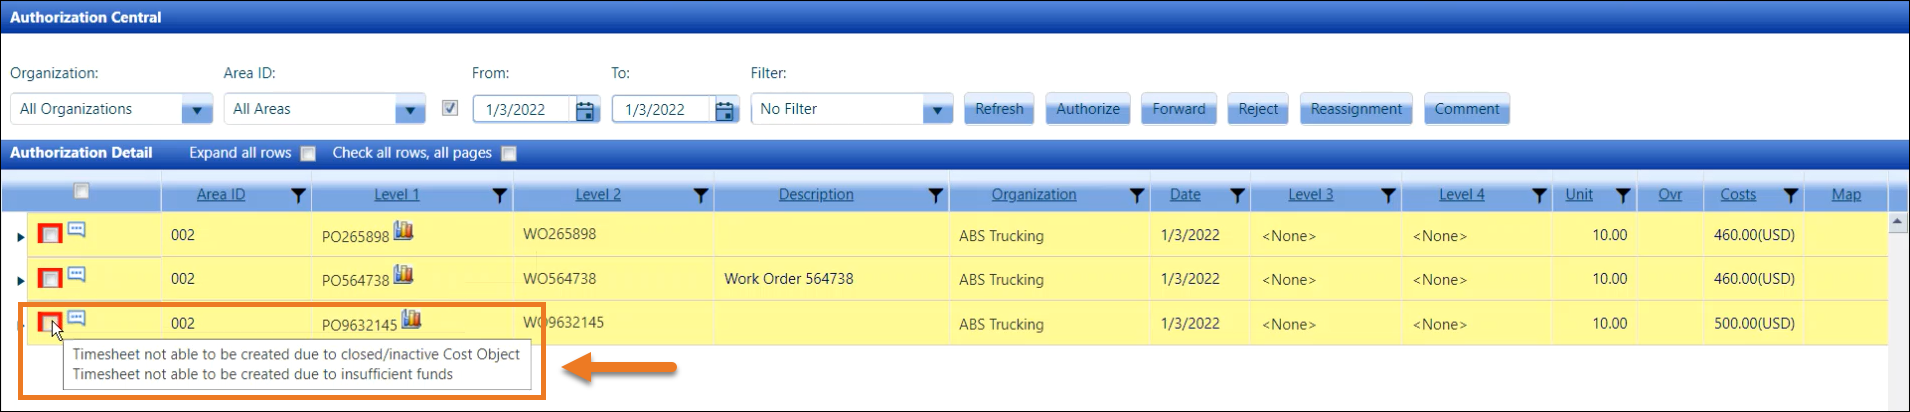
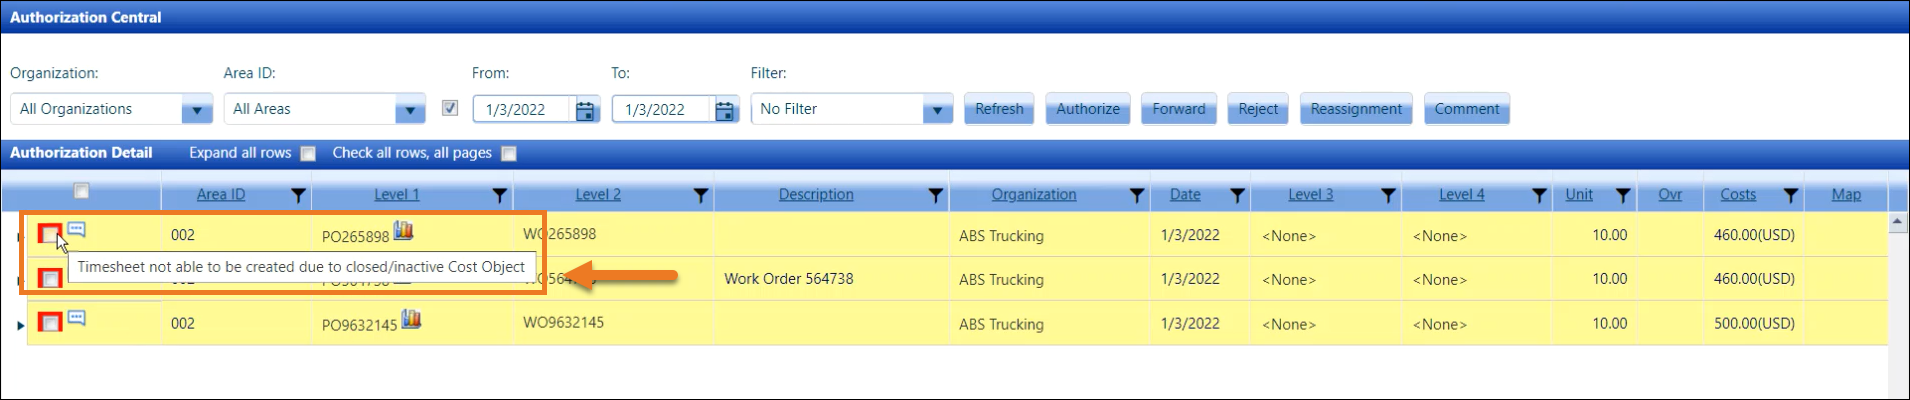
When the Enable authorization blocking for inactive Cost Objects option is enabled, and the cost objects have expired and/or are inactive, the red box will be displayed around the checkboxes at the Authorization Central screen for Authorization Central and Express Central. Hovering a mouse pointer over the checkbox at the Cost Object level will display the message, "Timesheet not able to be created due to closed/inactive Cost Object." These allocations pending authorizations line items will also display in yellow.
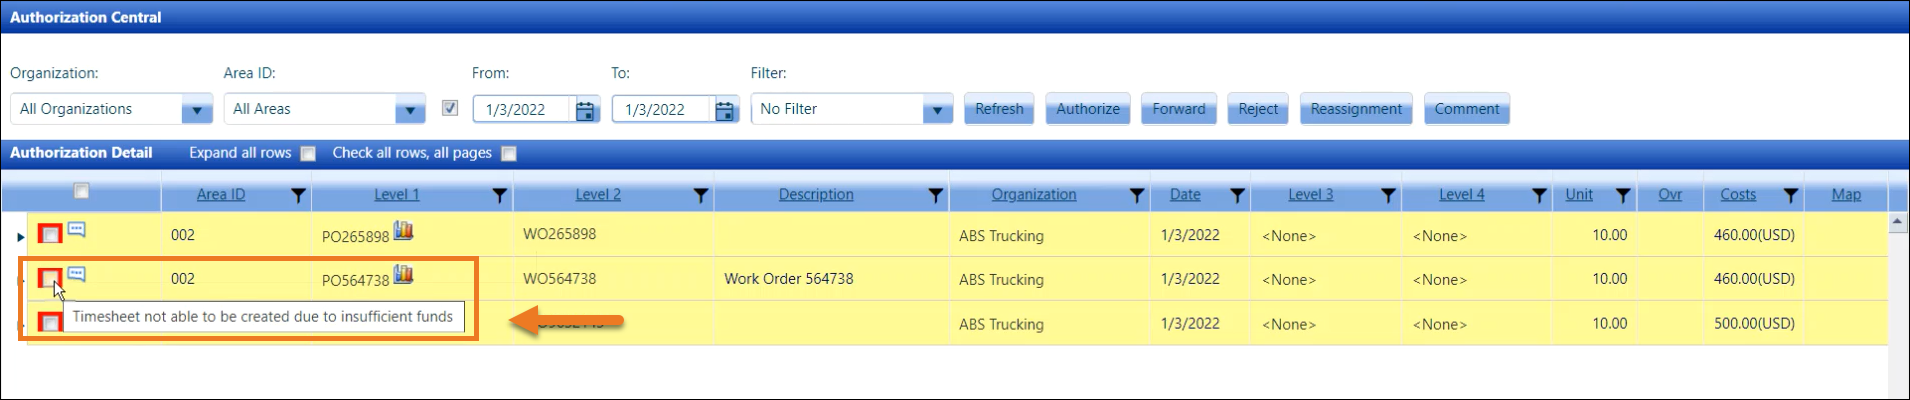
When the Enable
Level 1/Level 2 Stop option is enabled, and the cost objects do
not have sufficient funds for the pending allocations, the red box will
be displayed around the checkboxes for these cost objects on the Authorization
Central screen for Authorization Central and Express Central. Hovering
a mouse pointer over the checkbox at the Cost Object level will display
the message, " Timesheet not able to be created due to insufficient
funds." These allocations pending authorizations line items will
also display in yellow.
The Enable authorization blocking for inactive Cost Objects and Enable Level 1/Level 2 Stop options can be enabled and disabled at the Application Settings screen. When both options are enabled, and the cost objects have expired, are inactive, and have insufficient funds for the allocation pending authorization, both messages will be displayed when hovering a mouse pointer over the checkbox at the Cost Object level. These allocations pending authorizations line items will also display in yellow. This new feature applies to the Authorization Central screen for Authorization Central and Express Central.