Active labor resources with hours are displayed by default on the Labor Hours screen.
Click the Activity menu link to open the Labor Hours screen.
Alternatively, hover a mouse pointer over the Activity menu link to display its drop-down menu.
Slide a mouse pointer over to the Labor Hours to display its menu.
Click the Labor Activity to open the Labor Hours screen.
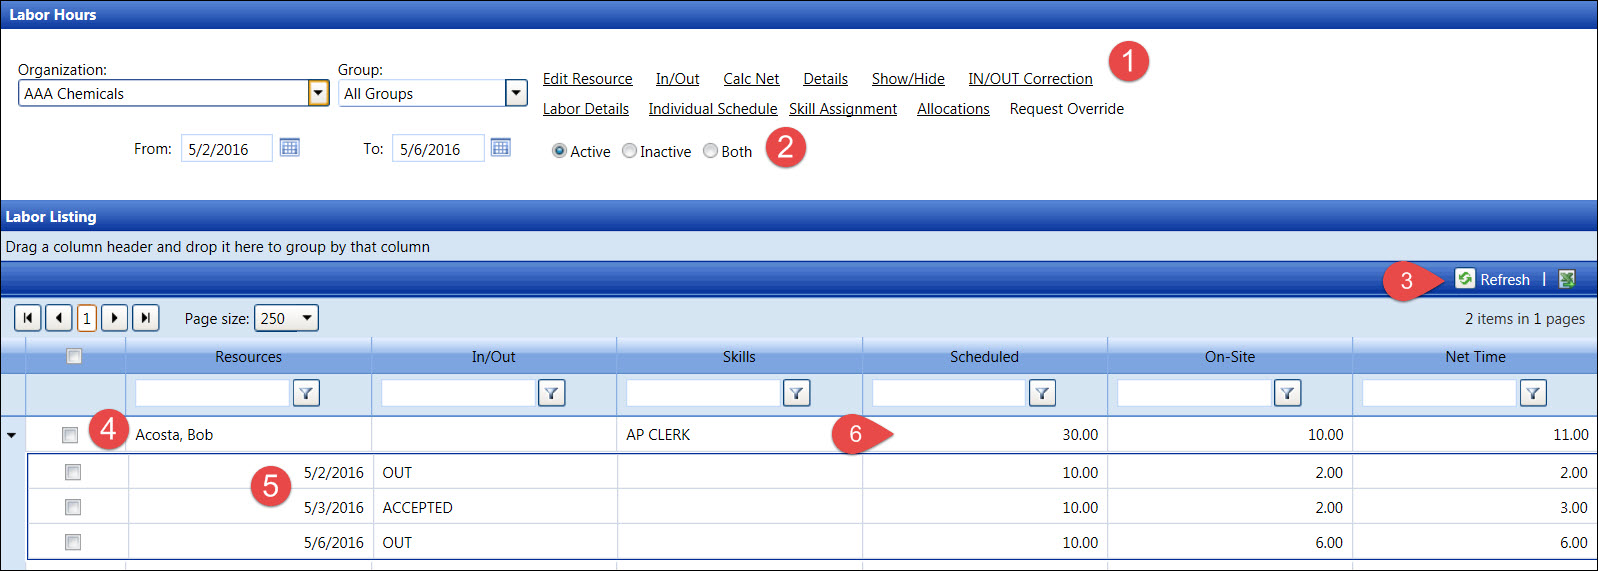
The Labor Hours links display on the Labor Hours screen are available for user to perform additional task such as resolving exceptions or recalculating hours. Refer to Understand the Labor Hours Links for more information.
Select Active, Inactive, or Both button to display the labor resources with active, inactive, or both statuses.
Click the Refresh icon to refresh the Labor Listing.
Labor resource's name is displayed. If the labor resources are assigned as a runner, then their names are in green texts.
If the date range is selected, click the Expand icon to open the listing, displaying the labor hours for the selected resource listed by date.
If there are more than one line items, then the Scheduled, On-Site, and Net Time grand total hours are displayed on the first row.
Link |
Description |
Edit Resource |
Opens the Labor Information screen. Refer to Labor Resources for more information. |
In/Out |
Opens the Resource In/Out screen. Refer to Resource Event for more information. |
Calc Net |
Display the net calculation options. Refer to Recalculate Hours (Calc Net) for more information. |
Details |
Opens the Pay Computation Detail screen. Refer to Pay Computation Detail for more information. |
Show/Hide |
Display the labor resources with or without the events. |
IN/OUT Correction |
Add an In or Out time to correct a missing time for the pair of event. |
Labor Details |
Opens the Labor Details screen. Refer to Resource Event for more information. |
Individual Schedule |
Opens the Assignment - Individual Schedule screen. Refer to Individual Schedule for more information. |
Skill Assignment |
Opens the Agreement and Skill Assignment screen. Refer to Skill Assignment for more information. |
Allocations |
Opens the Allocate Labor screen. Refer to Allocate Labor Hours for more information. |
Request Override |
Open the Override Hours screen where Track user may request an override of hours for the selected resource or resources. Refer to Request Override Hours for more information. |
If applicable, select a location from the Location drop-down list located at the menu bar.
From the Labor Hours screen, select an organization from the Organization drop-down list.
The All Groups option in the Group drop-down list is selected by default. Select a specific labor group from the Group drop-down list to limit the display to a smaller list of resources. Otherwise, proceed to the next step.
Enter a date or date range into the From and/or To text boxes. Alternatively, select the dates from the calendars. (see also Date Format)
All of the labor resources with activities and within the selected date or date range are displayed in the Labor Listing. There are several ways to view the labor resources with different status.
Click the Show/Hide button to display the labor resources with or without the events.
The Active button is selected by default, displaying the labor resources with the Active status.
Click the Inactive button to display the labor resources with the Inactive status.
Click the Both button to display the labor resources with the Active and Inactive status.
(A) is displayed next to a labor resource's name, representing an active status.
(I) is displayed next to a labor resource's name, representing an inactive status.
Related Topics