If the Auto Check Authorized option is selected from the Application Settings screen, then all of the checkboxes in the Allocation Detail grid are automatically selected. Otherwise, the checkboxes will remain empty. Refer to Application Settings for more information. Once the line items are expanded, the hours, costs, and charges are grouped by Labor, Equipment, or Materials.
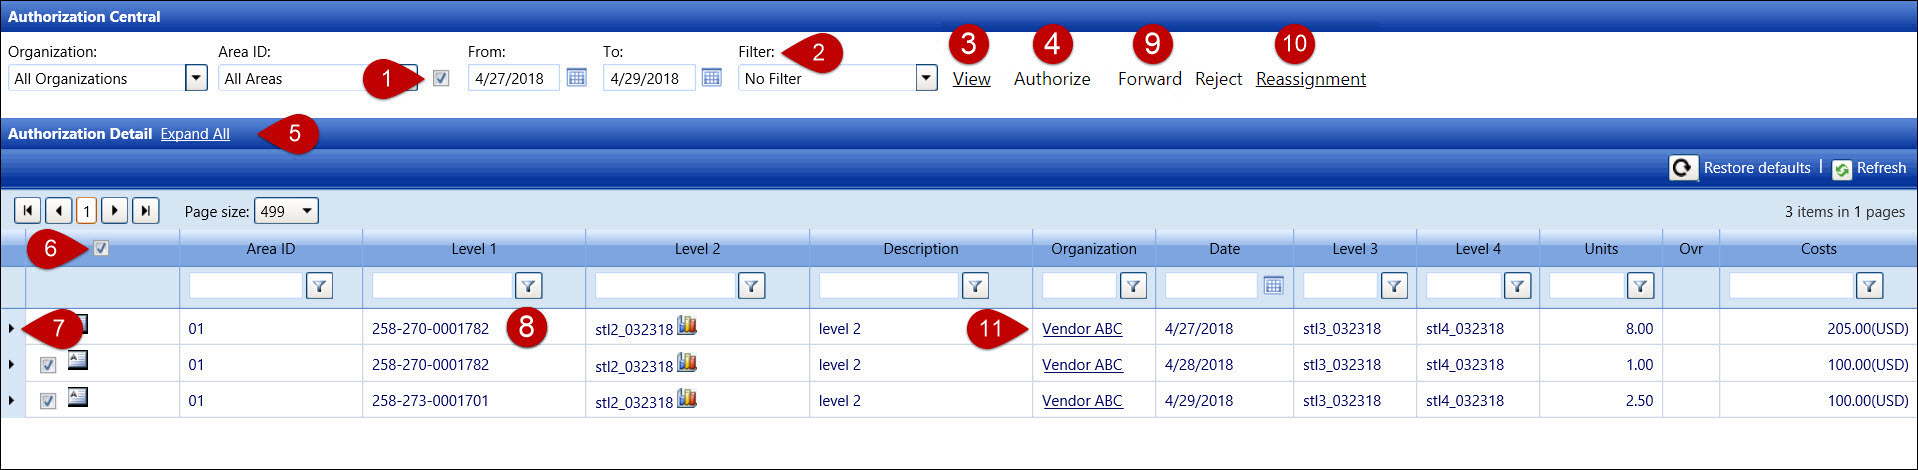
Click this checkbox, located between the Area ID drop-down list and From text box, to enable the From and To text boxes and the calendars.
Click the Filter drop-down list and select Labor, Equipment, or Material option to display specific records in the Authorization Detail grid.
Click the View link to display the available hours, costs, or charges within the selected date or date range.
The Authorize or Reject link is for authorizing or rejecting the selected hours, costs, or charges.
The Authorization Detail grid displays the available hours, costs, or charges that are ready for authorization. Click the Expand All link to display all line items in the Authorization Detail grid. After the Expand All link is selected, the option changes to Collapse All link.
Click this checkbox, located at the column header, to select or deselect all of the checkboxes that are displayed on the selected page.
Click the Expand icon
![]() on the summarized level
to expand and display the module details. Click the Expand
icon at the Labor, Equipment, or Material level to review additional
line item information.
on the summarized level
to expand and display the module details. Click the Expand
icon at the Labor, Equipment, or Material level to review additional
line item information.
Hover a mouse pointer over any of the Level 1 items to enable a pop-up, display the Level 1 information.
The Forwarding link is a functionality that allows the Approvers the ability to forward the allocations that are pending authorization to another Area ID.
The Reassignment link is for the users to reassign accepted allocations for a date range from one area ID to another for review and Authorization.
Click an organization link to view an agreement's attachment.
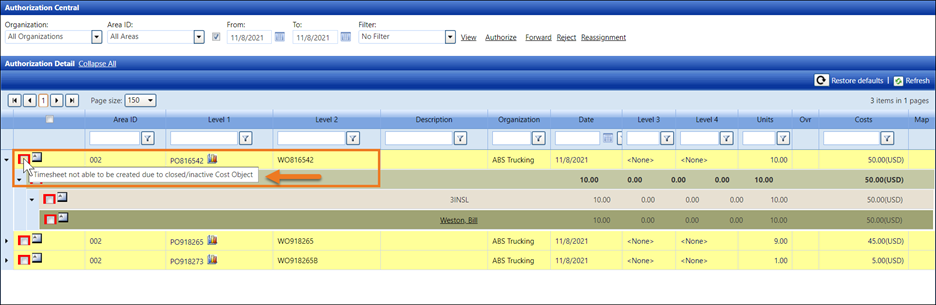
When the Enable authorization blocking for inactive Cost Objects option is enabled, and the cost objects have expired and/or are inactive, the red box will be displayed around the checkboxes at the Authorization Central screen for Authorization Central and Express Central. Hovering a mouse pointer over the checkbox at the Cost Object level will display the message, "Timesheet not able to be created due to closed/inactive Cost Object." These allocations pending authorizations line items will also display in yellow.
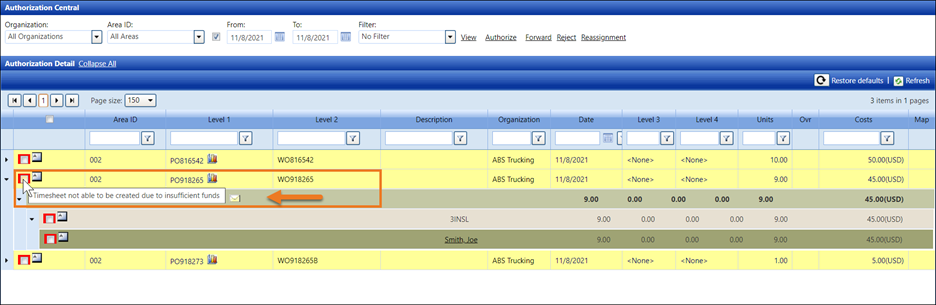
When the Enable
Level 1/Level 2 Stop option is enabled, and the cost objects do
not have sufficient funds for the pending allocations, the red box will
be displayed around the checkboxes for these cost objects on the Authorization
Central screen for Authorization Central and Express Central. Hovering
a mouse pointer over the checkbox at the Cost Object level will display
the message, " Timesheet not able to be created due to insufficient
funds." These allocations pending authorizations line items will
also display in yellow.
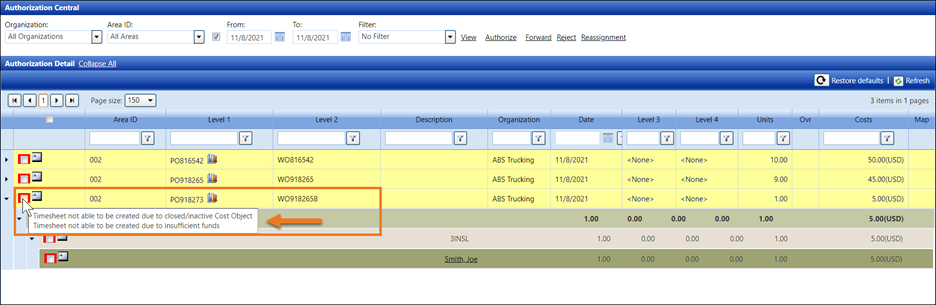
The Enable authorization blocking for inactive Cost Objects and Enable Level 1/Level 2 Stop options can be enabled and disabled at the Application Settings screen. When both options are enabled, and the cost objects have expired, are inactive, and have insufficient funds for the allocation pending authorization, both messages will be displayed when hovering a mouse pointer over the checkbox at the Cost Object level. These allocations pending authorizations line items will also display in yellow. This new feature applies to the Authorization Central screen for Authorization Central and Express Central.
From the Authorization Central screen, click the Override
icon or a labor resource name to open the Labor Detail dialog box, displaying
the selected resource's hours, costs, and related information.
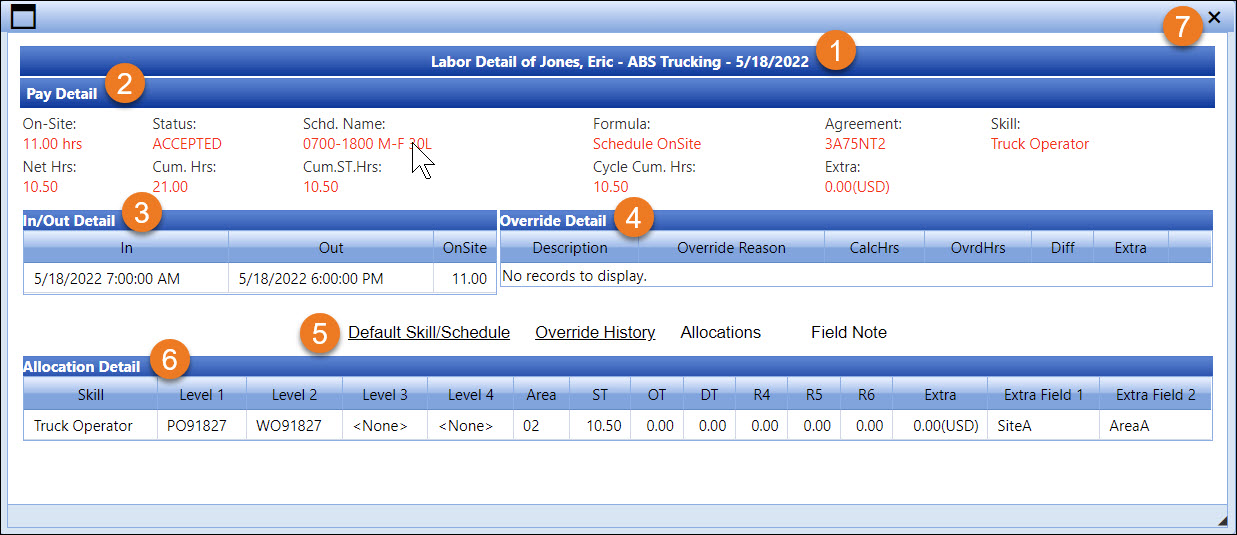
The selected labor resource name, his organization, and selected timesheet date are displayed.
The selected labor resource's pay detailed information is displayed.
The In/Out Detail grid displays the IN/OUT events. Refer to Resource Event for more information.
The Override Detail grid displays the override information. Refer to Override Labor Hours and Extra Charges for more information.
Labor Detail links:
Click the Default Skill/Schedule to display the Skill Assignment and Detail Schedule Assignment Detail grids.
Click
the Override History link to display the Override History
Detail grid, including any comments for the original Override
Request or the Attachment icon ![]() for an override
attachment.
for an override
attachment.
Click the Allocations link to display the Allocation Detail grid. If using the Extra Fields for Allocations, they will display in the Allocation Detail grid. Refer to Labor Detail Dialog Box for Authorization Central and Express Central Screens for more information.
Click the Map link to display the Geo Authorization grid and map.
If one of the Labor Detail links is selected, the selected link's information grid appears here.
Click the Close icon to close the Labor Detail dialog box.