Hover a mouse pointer over the Activity menu link on the menu bar to display its menu.
Slide a mouse pointer over the Pre-Approvals option to display its menu.
Click Pre-Approval Request
to open the Pre-Approval Request screen.
Before submitting the pre-approval requests, ensure the pre-approval reasons and the amount of limits for authorization are set up at the global settings. Refer to Pre-Approval Reasons, Pre-Approval Reasons for Organization, or Pre-Approval Limits for more information.
The user may create several pre-approval requests. However, each pre-approval request cannot exceed the assigned amount of limit for authorization.
Hover a mouse pointer over the Activity menu link on the menu bar to display its menu.
Slide a mouse pointer over the Pre-Approvals option to display its menu.
Click Pre-Approval Request
to open the Pre-Approval Request screen.
If applicable, select a location from the Location drop-down list located at the menu bar.
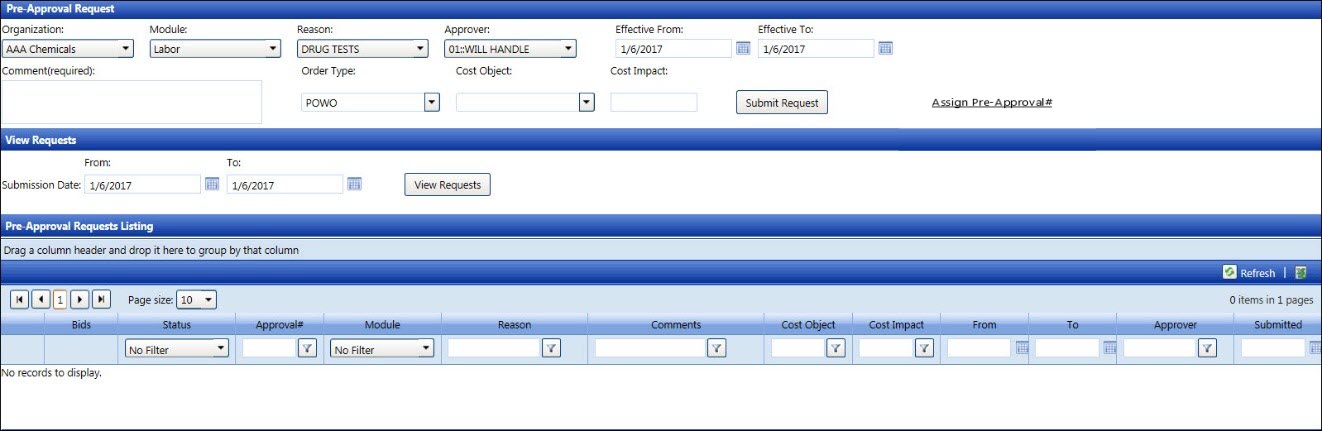
From the Pre-Approval Request screen, select an organization from the Organization drop-down list.
The pre-approval requests are listed in the Pre-Approval Request Listing by the submission date. From the View Requests area, enter a submission date or date range into the From and To text boxes, or select the dates from the calendars. (see also Date Format)
Click the View Requests button to display the pre-approval requests for the selected dates in the Pre-Approval Requests Listing.
Use the filter feature to search for the specific pre-approval
request. If one or more bid documents are attached to the pre-approval
requests, hover a mouse pointer over the Attached
Bid Documents icon ![]() to enable a tool-tip,
displaying the number of attached bid documents. The approved pre-approval
requests will have the approval numbers. If the pre-approval requests
are rejected, hover a mouse pointer over the Rejected
status to display the comment for a rejection.
to enable a tool-tip,
displaying the number of attached bid documents. The approved pre-approval
requests will have the approval numbers. If the pre-approval requests
are rejected, hover a mouse pointer over the Rejected
status to display the comment for a rejection.
Refer to Personal Information for more information about the notification by email and turning on the alert setup.
If applicable, select a location from the Location drop-down list located at the menu bar.
From the Pre-Approval Request screen, select an organization from the Organization drop-down list.
Select the Labor, Equipment, or Material option from the Module drop-down list. The pre-approval reasons for the selected module appear in the Reason drop-down list.
Select a pre-approval reason from the Reason drop-down list.
Select an approver from the Approver drop-down list.
Enter the effective start and end dates into the Effective From and Effective To text boxes, or select the dates from the calendars. (see also Date Format)
Enter a comment in the Comment text box.
If the pre-approval request requires a cost object or if the cost object is a mandatory field, select an order type from the Order Type drop-down list then select a cost object from the Cost Object drop-down list. Otherwise, proceed to the next step.
The pre-approval amount must be within the assigned amount of limit for authorization. Enter an amount for the pre-approval request into the Cost Impact text box.
Click the Submit Request button to save and display the pre-approval request with a Pending status in the Pre-Approval Requests Listing. The message displays, “Request submitted successfully." The pre-approval request is sent to the selected approver by an internal or external email. The alert for the pending pre-approval request is also displayed at the Track Home Page.
The pre-approval request cannot be edited. However, it can be deleted if it is pending approval. Only pre-approval requests with Pending status can be deleted.
From the Pre-Approval Requests Listing, click the Delete icon on the line item. The delete confirmation pop-up message appears.
Click OK to delete the selected pre-approval request.