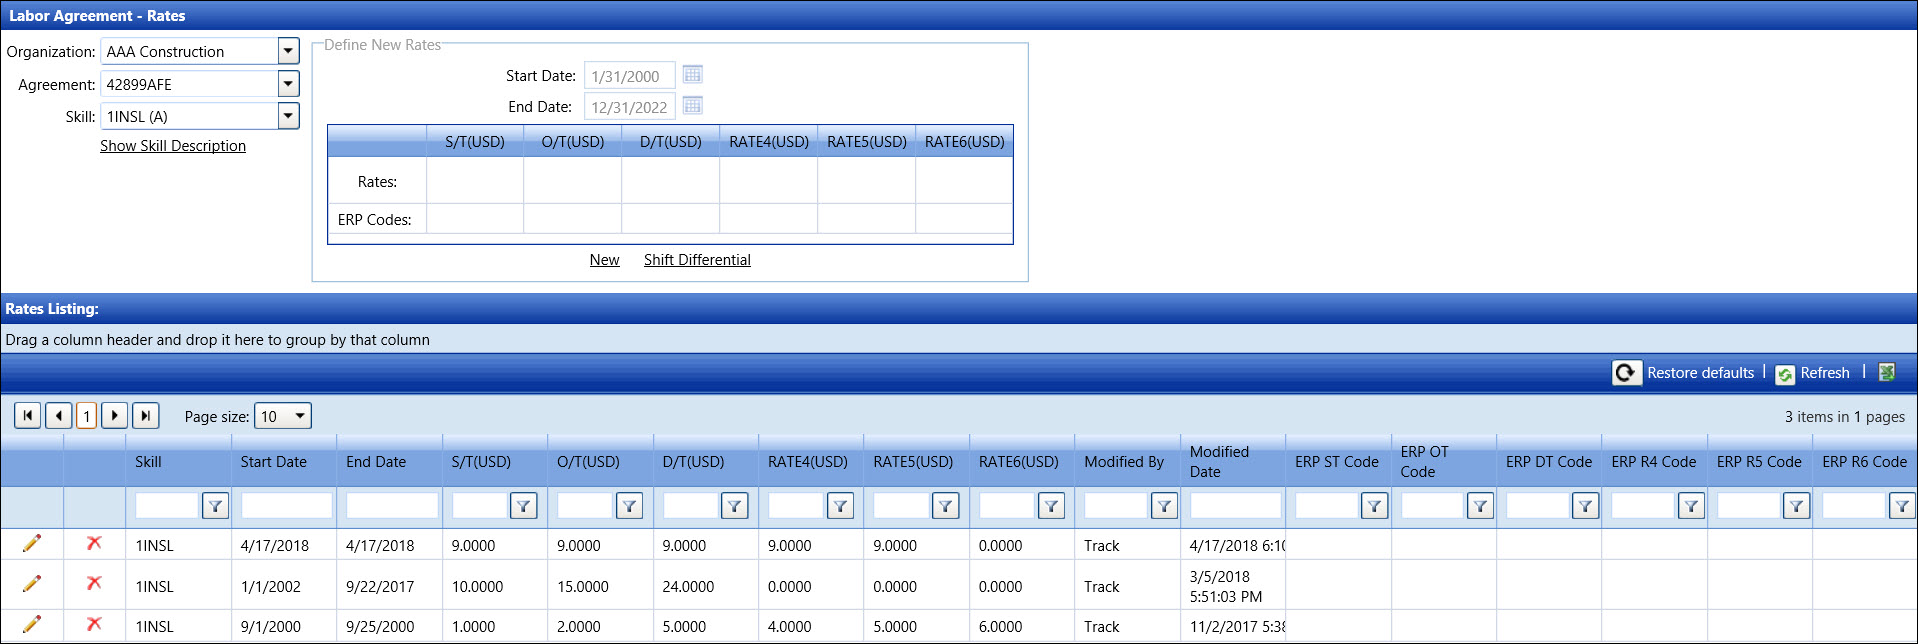
Labor Rates
When entering a new rate, the end date of the old rate will be reset
automatically to the same date as the start date of the new rate. The
labor rate's end date cannot exceed the agreement's end date and should
be the agreement's end date to allow for agreement extension functionality.
Click the Show Skill Description
to open the Skill Description dialog box, displaying the selected labor
skill's description.
Open the Labor Rates screen
Hover a mouse pointer over the Settings menu link on
the menu bar to display its drop-down menu.
Slide a mouse pointer over to the Labor
option to display its menu.
Click Rates to open
the Labor Agreement - Rates screen.
Alternatively, access the Labor Agreement - Rates screen by
clicking the Labor Rates link
on the Labor Agreement/Assign Skills screen.

Add labor rates
If applicable, select a location from the Location
drop-down list located at the menu bar.
From the Labor Agreement - Rates screen, select an organization
from the Organization drop-down list.
Select an agreement from the Agreement drop-down list.
Select a labor skill from the Skill drop-down list. Any
previously assigned rates are displayed in the Rates Listing.
From the Define New Rates area, click New to enable the
Start Date, End Date, and Rates text boxes.
Enter the start and end dates into the Start Date and
End Date text boxes. Alternatively, select the dates from the
calendars. (see also Date
Format)
All of the Rate text boxes must contain a number. Enter the
straight time rate into the S/T text box, the overtime rate
into the O/T text box, the double-time D/T text box,
the other defined rate amounts into the Rate4, Rate5,
and Rate6 text boxes.
If applicable, enter the ERP
Codes for each labor rate into the appropriate text boxes.
Click Add to save and
display the new rates in the Rates Listing.
Add non-billable skill rates
If using the non-billable skill rates, ensure the Block
Allocation for Resources with missing Skill or Rate checkbox is
deselected on the Application Setting screen. Refer to Application
Settings for more information.
If applicable, select a location from the Location
drop-down list located at the menu bar.
From the Labor Agreement - Rates screen, select an organization
from the Organization drop-down list.
Select an agreement from the Agreement drop-down list.
Select Non-Billable Skill
from the Skill drop-down list. Any previous assigned rates
are displayed in the Rates Listing.
From the Define New Rates area, click New to enable the
Start Date, End Date, and Rates text boxes.
Enter the start and end dates into the Start Date and
End Date text boxes. Alternatively, select the dates from the
calendars. (see also Date
Format)
Enter 0 in all of the
Rate text boxes.
If applicable, enter the ERP
Codes for each labor rate into the appropriate text boxes.
Click Add to save and
display the new non-billable skill rate in the Rates Listing.
Follow the steps in Skills
Assignment but selected Non-Billable
Skill from the Skills
drop-down list.
When allocating the non-billable skills, follow the steps in
Allocate
labor hours and/or extra costs and ensure to select Non-Billable
Skill from the Skill Type
drop-down list. For the Quick
Allocation of Labor Hours and Costs, select Non-Billable
Skill from the Skill
drop-down list.
Edit labor rates
Use the editing feature only to make corrections to the initial entries.
Enter new labor rates with new labor rate dates to change rates.
From the Rates Listing, click the Edit icon on the line
item to enable the Rates and ERP Codes text boxes.
Make the corrections to the rate amounts or the ERP codes, then
click the Update icon to save the modifications.
Delete labor rates
The labor rate cannot be deleted if it is in used.
From the Rates Listing, click the Delete
icon on the line item. The delete confirmation pop-up message appears.
Click OK to delete the
selected labor rates.
Related Topic
Shift
Differentials
