Hover a mouse pointer over the Allocations menu link to display its drop-down menu.
Slide a mouse pointer over to the Allocations to display its menu.
Click Quick Allocation to display the Quick Allocation
- Labor screen.
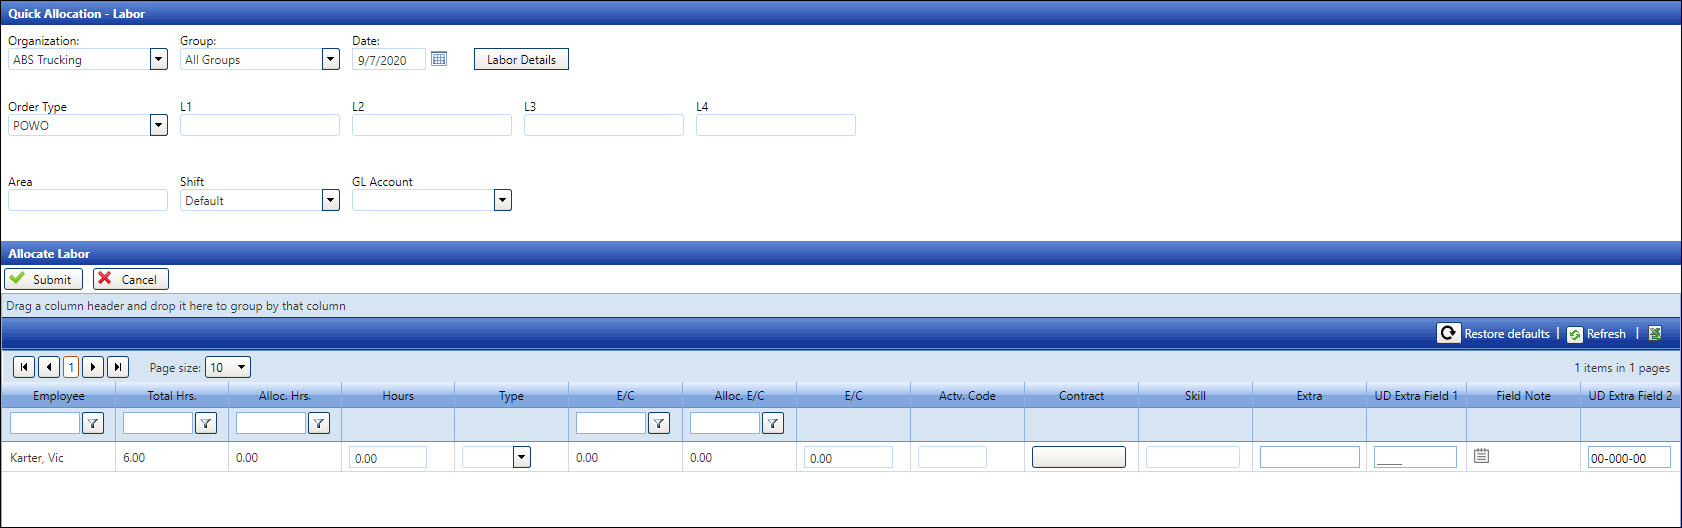
The quick allocation of hours and costs is completed in the Quick Allocation - Labor screen. The quick allocation feature is used to allocate hours and costs for several labors who work the same job. After the work order information is entered, enter the total number of hours or number 99 without selecting the hour type. Track will automatically distribute the ST, OT, and DT hours accordingly.
Clicking the Labor Details button will open the Labor Details screen.
Clicking the following active links to access more information:
Overrides Labor Hours and Extra Charge for more information on the overrides completed on Labor Details screen.
Quick Allocation of Labor Hours and Costs by Resource to perform the quick allocation for selected labor resources.
Show Descriptions for Cost Objects feature for information on how to enable or disable this feature.
Hover a mouse pointer over the Allocations menu link to display its drop-down menu.
Slide a mouse pointer over to the Allocations to display its menu.
Click Quick Allocation to display the Quick Allocation
- Labor screen.
If applicable, select a location from the Location drop-down list located at the menu bar.
From the Quick Allocation - Labor screen, select an organization from the Organization drop-down list.
Select a labor group from the Group drop-down.
Enter a timesheet date into the Date text box. Alternatively, select a timesheet date from the calendar. (see also Date Format) From the Allocate Labor grid, the labor resources with the available hours and costs, for the selected organization, group, and timesheet date, are displayed.
Select the order type from the Order Type drop-down list.
Enter or select the cost object information from the appropriate text box/drop-down list.
Enter or select the area ID from the Area ID text box/drop-down list.
Select the shift or GL account from the Shift or GL Account drop-down list, if applicable.
For each labor resource, enter the total number of hours into the Hours text box.
Enter the cost amount into the E/C text box.
Enter or select the activity code from the Actv. Code text box/drop-down list.
Verify the contract and skill by hovering the mouse pointer over their text box/drop-down list to display the tooltip. Enter or select the contract and skill from Contract and Skill text box/drop-down list to override the pre-assigned information. Otherwise, proceed to the next step.
Enter additional information, up to 50 characters, into the Extra text box or leave the text box empty.
Click the Submit button to allocate the hours and costs.