Hover a mouse pointer over the Allocations menu link to display its drop-down menu.
Slide a mouse pointer over to the Allocations to display its menu.
Click Labor Manual Hours to
open the Manual Time Entry and Allocation screen.

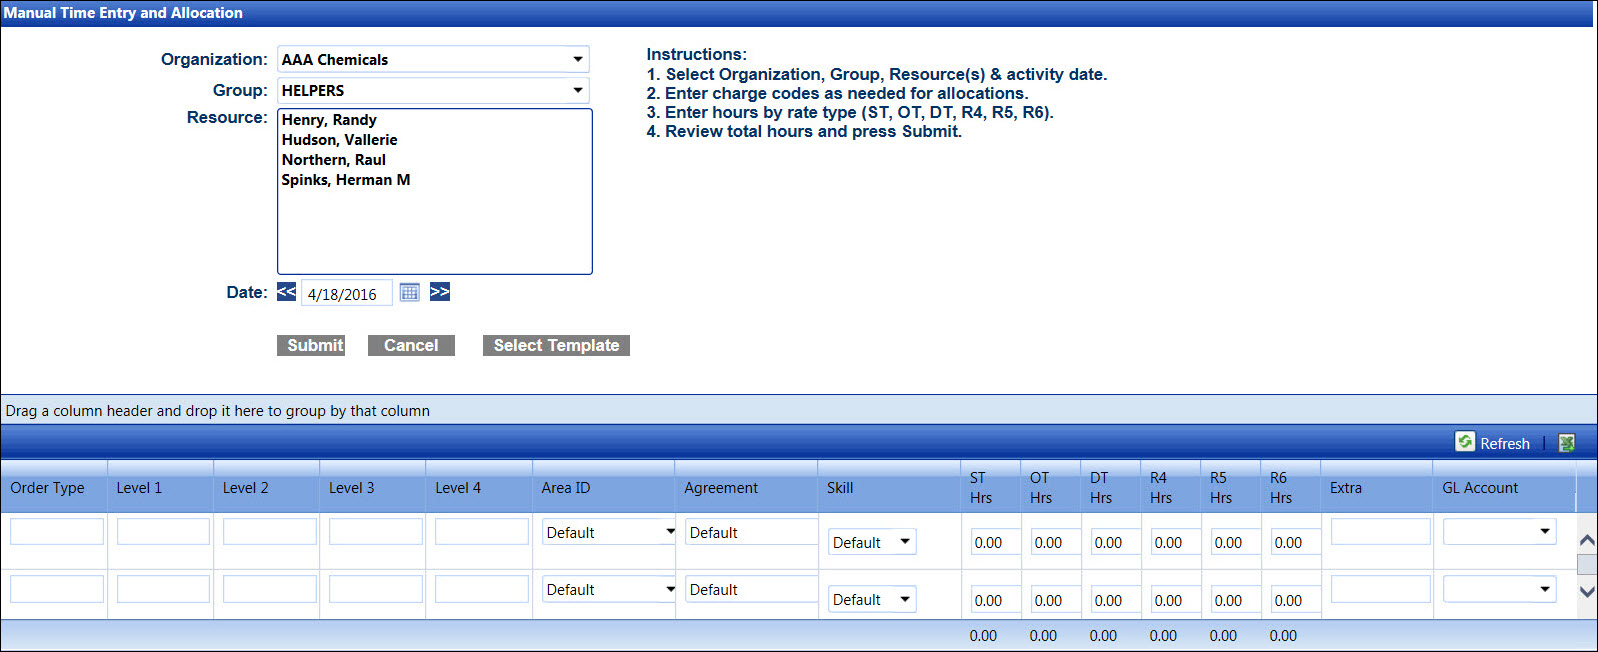
Manual time entry and allocation allows a labor resource to enter his/her own hours and allocations. This functionality is designed for field service workers who work off-site and are not served by a central timekeeper. This feature requires that the individual be assigned the Track user_ID associated with the Track resource Labor_ID.
There are two methods to provide the association of user_ID to Labor_ID.
Track-Admin account configuration
A personal information configuration from the Personal Information screen (see also Personal Information)
Hover a mouse pointer over the Allocations menu link to display its drop-down menu.
Slide a mouse pointer over to the Allocations to display its menu.
Click Labor Manual Hours to
open the Manual Time Entry and Allocation screen.

If the hours have been allocated and are ready for acceptance, the asterisks appear next to the labor resources.
If applicable, select a location from the Location drop-down list located at the menu bar.
From the Manual Time Entry and Allocation screen, select an organization from the Organization drop-down list.
The All Groups option in the Group drop-down list is selected by default. Select a specific labor group from the Group drop-down list to display its labor resources in the Resource list box. Otherwise, proceed to the next step.
Select one or more labor resources from the Resource list box.
Enter the date into the Date text box. Alternatively, click the double arrows icon to move a date forward or backward one day, or select a date from the calendar. (see also Date Format)
From the grid, enter the order type into the Order Type text box.
Enter the cost object information into the appropriate text boxes.
The Default option in the Area ID drop-down list is an area ID assigned to the Level 2 cost object. If applicable, select an area ID from the Area ID drop-down list.
The Default option is a default for the Agreement and Skill drop-down lists which will allow the allocation to assign agreement and skill of the selected labor resource. Proceed to the next step.
Enter the hours into the ST Hrs, OT Hrs, and/or DT Hrs text boxes and the other defined hours into the R4 Hrs, R5 Hrs, and/or R6 Hrs text boxes.
Enter additional information into the Extra text box, if applicable.
Select a GL account from the GL Account drop-down list, if applicable.
Click the Submit button to save and allocate the hours to the selected labor resource.
Related Topic