Auto-Allocations
for Labor Resources
Users may assign cost objects to a labor resource or a group of labor
resources for auto allocation. Auto-allocations require user to click
on the labor resource on the Allocation screen to apply the allocation
on the selected date. Labor resources with assigned auto-allocation that
are not selected will not receive an auto-allocation assignment.
Assign an auto-allocation to labor resources
The Text Box feature is used in this instruction. When accessing the
Add Auto Allocation area, the
text boxes for Level One through Four are displayed by default. Click
the DropDown link to enable the
Level One, Three, and Four drop-down lists. Because the number of work
orders in the Level Two is quite large, populating the Level Two as a
drop-down list will cause a delay. Thus, the Level Two setup as a text
box by default, and its information must be entered manually.
Once an auto-allocation is assigned to the labor resources, the schedule
are displayed with the assignment pattern. The Legend is located at the
bottom of the Daily Scheduled Resources screen. If the labor resources
have the activities for the selected date, then their names are displayed
in the schedule grid. Click the Show/Hide
link to display the labor resources without an activity on the selected
date.
Auto-allocations require the user to click on the labor resource on
the Allocations screen to apply the allocation. The labor resources that
are not selected will not receive an auto-allocation assignment.
Click the Schedule menu
link to open the Daily Scheduled Resources screen.
If applicable, select a location from the Location
drop-down list located at the menu bar.
From the Daily Scheduled Resources screen, select an organization
from the Organization drop-down
list.
Select a labor group from the Group
drop-down list.
Enter a date into the Date
text box to display the labor resources in the schedule grid. Alternatively,
select a date from the calendar. (see also Date
Format)
From the schedule grid, select a checkbox on a line item to
select specific labor resource.
From the Add Auto-Allocation area, enter a date or a date range
into the From and To
text boxes. Alternatively, select the dates from the calendars. (see
also Date
Format)
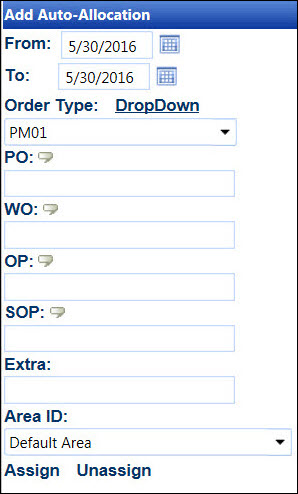
Select an order type from the Order
Type drop-down list to display
the Levels' text box names.
Enter the Levels' information into the appropriate text boxes.
Enter additional information into the Extra
text box, if applicable.
Select an area ID from the Area
ID drop-down list.
Click Assign to assign
the auto-allocation to the selected cost objects for the selected
labor resources.
Unassign an auto allocation from labor resources
From the schedule grid, click
the checkbox
on a line item to select specific labor resource.
From the Add Auto-Allocation area, enter a date or a date range
into the From and To
text boxes. Alternatively, select
the dates from the calendars. (see also Date
Format)
Select an order type from the Order
Type drop-down list to display
the Levels' text box names.
Enter the Levels information into the appropriate text boxes.
Click the Unassign link
to remove the cost objects from the selected labor resources.
Related Topic
Daily
Scheduled Resources