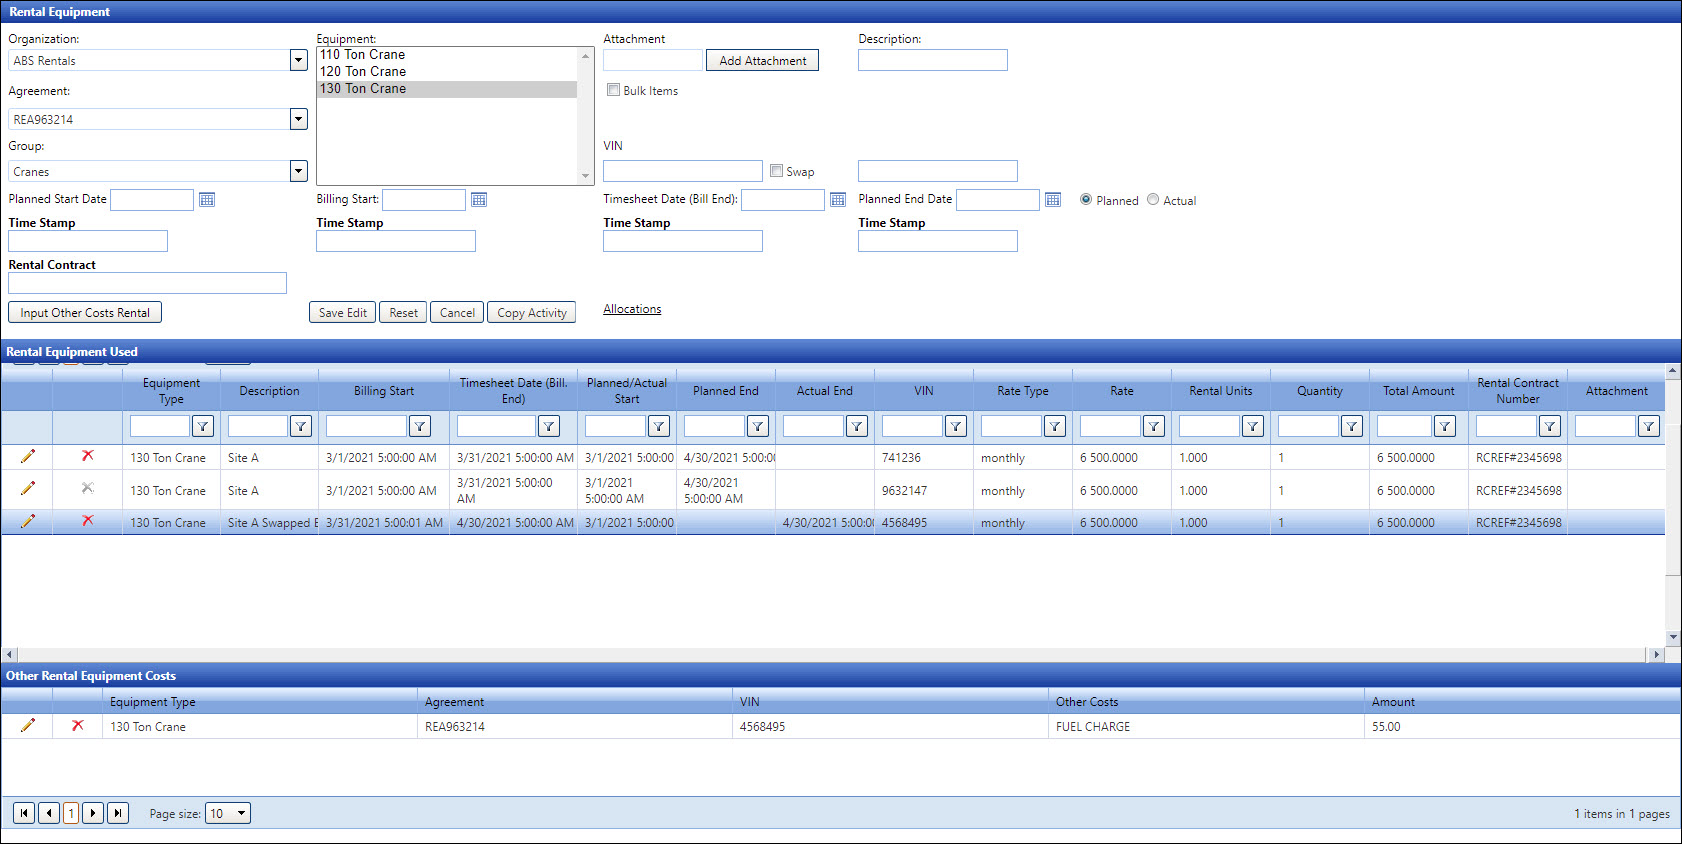
During the Activity process,
Vendor Timekeepers can add the rental equipment to begin their billing
process. Adding the rental equipment used is completed during a specific
period as stated in the Rental Contract. Once the information is added
during the Activity process, Track applies the defined rates to the rental
contract duration when calculating the charges for rental equipment.
After
accessing Track, hover a mouse pointer over Activity,
then select Rental Equipment Usage
to open the Rental Equipment screen.

Select
a rental equipment company from the Organization
drop-down list.
Select
a rental equipment agreement from the Agreement
drop-down list.
Select
a rental equipment group from the Group
drop-down list. The equipment type from the selected group display
in the Equipment list box.
Select
an equipment type from the Equipment
list box.
Enter
a rental equipment unique identification numbers into the VIN
text box.
The
Description text box requires an entry. Enter an information to clarify
a rental equipment activity into the Description
text box.
The
Planned button is selected
by default. Proceed to the next step if this rental equipment is on
rent. If this activity is the last entry, select the Actual
button then proceed to the next step.
Enter
a Rental Contract’s start date into the Planned/Actual
Start Date text box or select a date from the calendar.
Edit
the populated time in the Time Stamp text box to ensure that it is
aligned with the rental period.
Enter
the billing start date into the Billing
Start Date text box.
Edit
the populated time by enter the billing cycle start time into the
Time Stamp text box.
Timesheet
date or bill end date indicates the end of a billing cycle. Enter
a timesheet date into the Timesheet
Date (Bill End) text box or select a date from the calendar.
Edit
the populated time by entering the bill end time into the Time
Stamp text box.
Enter
a Rental Contract’s end date into the Planned/Actual
End Date text box or select a date from the calendar.
Edit
the populated time in the Time Stamp
text box to ensure that it is aligned with the rental period.
The
Rental Contract text box requires an entry. Enter the reference numbers
to the Rental Contract document into the
Rental Contract text box.
If
applicable, click the Add Attachment
button to attach a document related to this activity. The dialog box
opens.
Click
the Select File button to
locate and select a document.
Click
the Upload button to upload
and attach the selected document to this activity. The same attachment
applies to both the activity and the other costs.
Click
the Save Edit button. The
rental equipment is saved and displays in the Rental Equipment Used
grid.
Repeat
the steps to add another rental equipment from the same or different
equipment type.
Ensure the
activity for original rental equipment is allocated before proceeding
with the swapping process.
From
the Rental Equipment Used grid, select a rental equipment activity
on a line item where the Delete
icon is disabled. The disable Delete
icon indicates that this activity has been allocated.
Click
the Copy Activity button.
The selected rental equipment’s information is automatically populated
where appropriate.
Click
the Swap checkbox to enable
the Previous VIN text box.
Enter
a swapped equipment unique identification numbers into the VIN
text box.
Enter
the original equipment unique identification numbers into the Prev. VIN text box.
Edit
an information in the Description
text box to clarify the swapped rental equipment activity.
If
applicable, select the Planned
or Actual button, then proceed
to the next step.
Make
changes to the Bill Start and Timesheet Dates and Time Stamps, per
the swapped equipment billing cycle, in the appropriate text boxes.
Click
the Save Edit button. The
swapped rental equipment activity is saved and displays in the Rental
Equipment Used grid.
Repeat
the steps to swap another rental equipment from the same or different
equipment type.
From
the Rental Equipment screen, select a rental equipment company, a
rental equipment agreement, a rental equipment group from the appropriate
drop-down lists.
Select
an equipment type from the Equipment
list box.
Click
the Bulk Items checkbox to
enable the Quantity text box.
Enter
a number of bulk items into the Quantity
text box.
The
Description text box requires an entry. Enter an information to clarify
the bulk items into the Description
text box.
If
applicable, select the Planned
or Actual button, then proceed
to the next step.
Enter
a Rental Contract’s start date into the Planned/Actual
Start Date text box or select a date from the calendar.
Edit
the populated time in the Time Stamp text box to ensure that it is
aligned with the rental period.
Enter
the billing start date into the Billing
Start Date text box
Edit
the populated time by enter the billing cycle start time into the
Time Stamp text box.
Timesheet
date or bill end date indicates the end of a billing cycle. Enter
a timesheet date into the Timesheet
Date (Bill End) text box or select a date from the calendar.
Edit
the populated time by entering the bill end time into the Time
Stamp text box.
Enter
a Rental Contract’s end date into the Planned/Actual
End Date text box or select a date from the calendar.
The
Rental Contract text box requires an entry. Enter the reference numbers
to the Rental Contract document into the
Rental Contract text box.
If
applicable, click the Add Attachment
button to attach a document related to this activity. The dialog box
opens.
Click
the Select File button to
locate and select a document.
Click
the Upload button to upload
and attach the selected document to this activity. The same attachment
applies to both the activity and the other costs.
Click
the Save Edit button to save
the changes.
