The Alert Management
Tool allows Track Coordinators with the appropriate access in the TrackAdmin
application to manage the personal information details, notifications,
and alerts for other users. Track Coordinators can update individual or
multiple users’ Personal Information at a time.
Leveraging this
tool can increase the use of notifications and alerts from the Track system
which can reduce frustration for users and drive adherence to the daily
process.
After
accessing Track, hover a mouse pointer over Settings.
Drop
down to Configuration then
select Alert Management Tool
to open the Alert Management Tool screen.
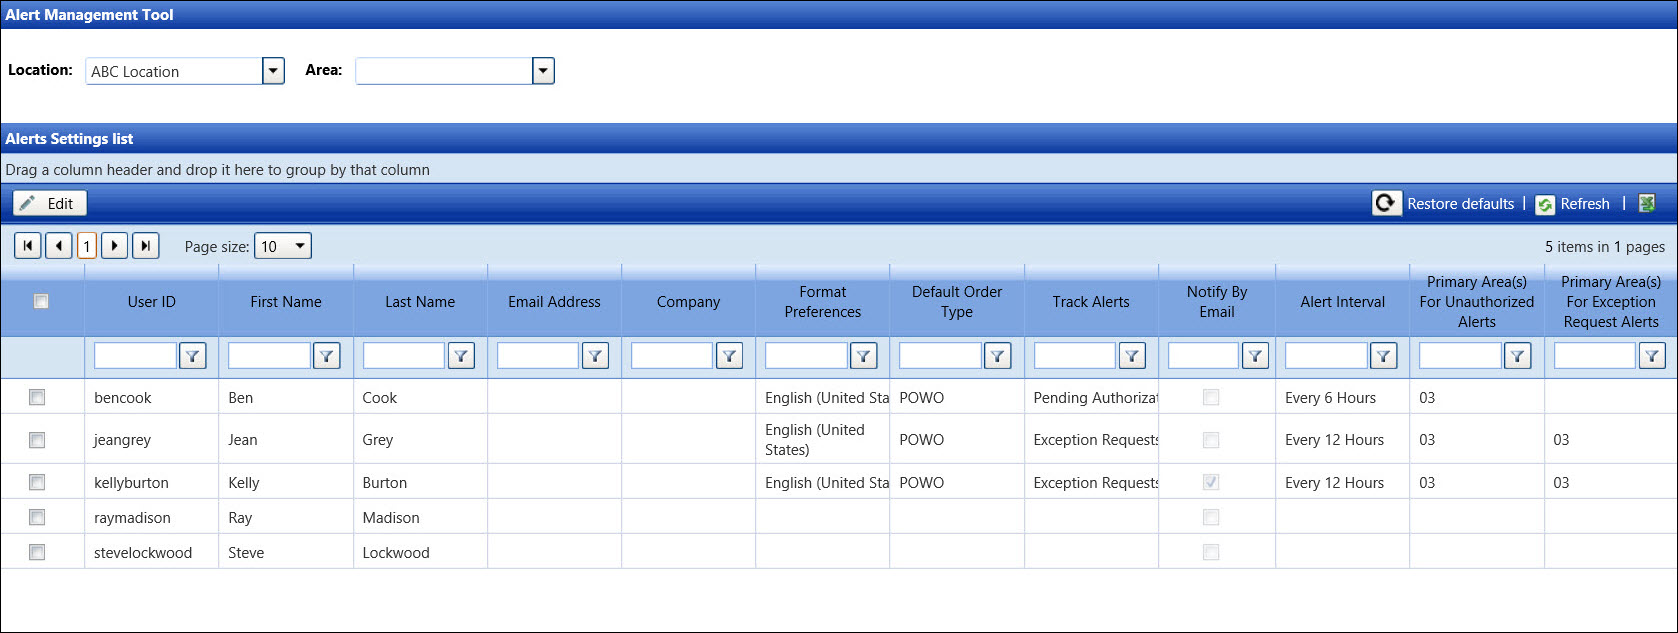
The
All option in the Location
drop-down list will display all users from all locations. Select a
specific location from the Location
drop-down list or proceed to the next step.
To
display the users with access to a specific area, select an area ID
from the Area drop-down list.
To display all users from all areas, leave the Area
drop-down list empty.
From
the Alerts Settings List, click a checkbox to select a user.
Click
the Edit button to open the
dialog box, displaying the selected user’s name at the dialog box’s
header and the information on the Alerts tab. The User ID and the
user’s profile name are also displayed at the top left of the dialog
box.
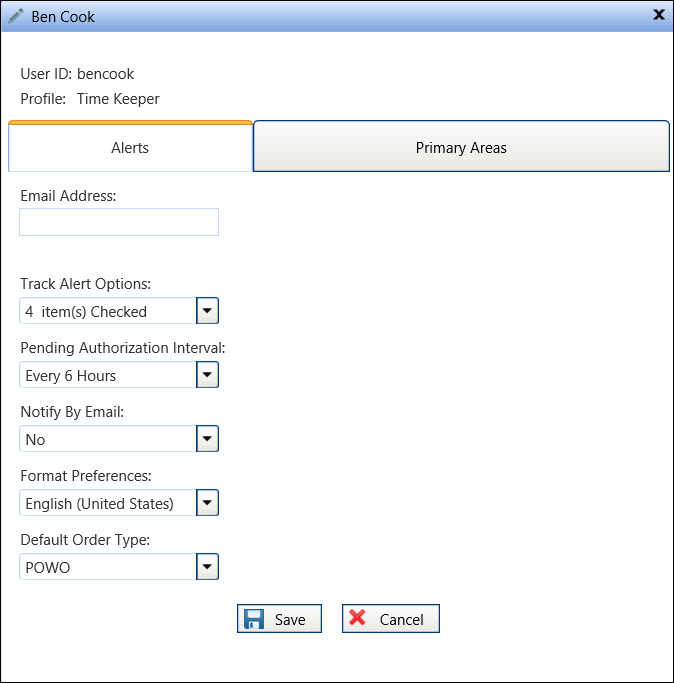
From
the Alerts tab, enter or edit the user’s email address into the Email Address text box.
A
number of selected Track Alert Options
are displayed in the Track Alert Options drop-down list. Hover a mouse
pointer over the drop-down list to display the selected options.
Alternatively,
click the Track Alert Options
drop-down list to display the selected options.
Select
or deselect the Track Alert Options
accordingly.
Select
the preferred delivery interval from the Pending
Authorization Interval drop-down list. All times are GMT.
Blank
– Alerts will not be sent.
Hourly
Intervals – Alerts will be sent at 12:00 AM, 1:00 AM, 2:00 AM,
etc. or the next hourly interval after these settings have been
submitted.
6
Hour Intervals – Alerts will be sent at 12:00 AM, 6 AM, 12:00
PM and 6:00 PM each day.
12
Hour intervals – Alerts will be sent at 12:00 AM and 12:00 PM
each day.
24
Hour Intervals – Alerts will be sent at 12:00 AM each day.
To
receive the internal messages as a Track Internal Message at the Track
Home page, select Yes from
the Notify By Email drop-down
list.
Select
a specific language from the Format
Preferences drop-down list.
Select
a default order type from the Default
Order Type drop-down list.
If
the user’s personal information does not require the selections for
the Unauthorized Alerts and Exception Request Alerts, then select
the Save button.
For
this tutorial, click the Primary
Areas tab to display the alert options. Depending on the user’s
profile, select the options for the alerts accordingly.
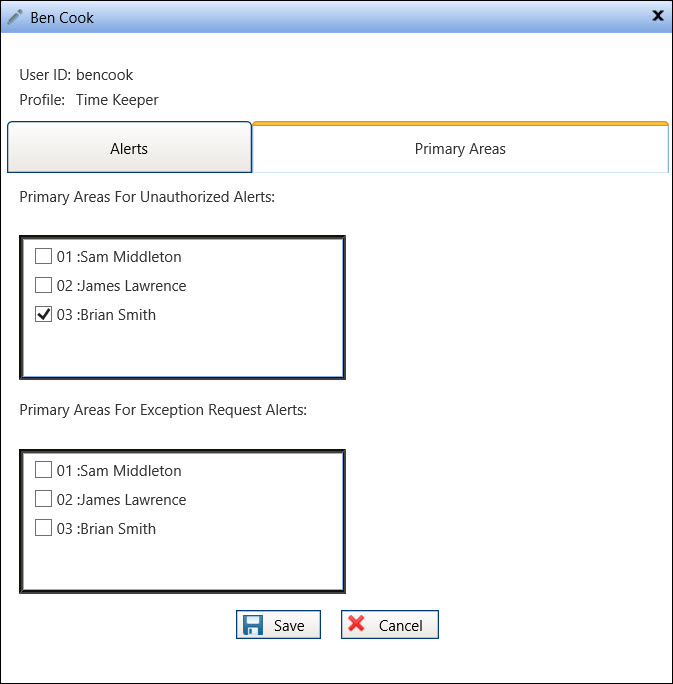
Select
one or more area IDs from the Primary
Areas for Authorized Alerts area.
Select
one or more area IDs from the Primary
Areas for Exception Request Alerts area.
Click
the Save button to save the
selected user’s personal information from both tabs.
From
the Alerts Settings List, click the checkboxes to select multiple
users.
Click
the Edit button to open the
dialog box.
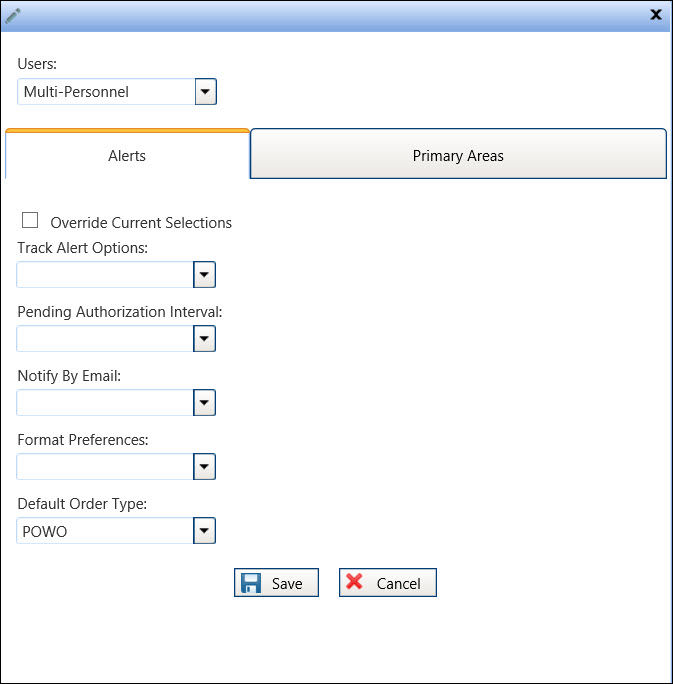
Hover
a mouse pointer over the Users
drop-down list to display the selected user IDs.
Click
the Users drop-down list to
display the users. Deselect one or more users to exclude these users
from the list or proceed to the next step.
Click
the Override Current Selections
checkbox to override the users’ previous personal information selections.
Keep in mind that any selections left blank will replace any previous
saved personal information selections.
Select
the track alert options from the Track
Alert Options drop-down list.
Select
the preferred delivery interval from the Pending
Authorization Interval drop-down list.
To
receive the internal messages as a Track Internal Message at the Track
Home page, select Yes from
the Notify By Email drop-down
list.
Select
a specific language from the Format
Preferences drop-down list.
Select
a default order type from the Default
Order Type drop-down list.
If
the users’ personal information does not require the selection for
the Unauthorized Alerts and Exception Request Alerts, then select
the Save button.
For
this tutorial, click the Primary
Areas tab to display the alert options. The area IDs displayed
are based on the selected users’ permitted area IDs. Depending on
the user’s profile, select the options for the alerts accordingly.
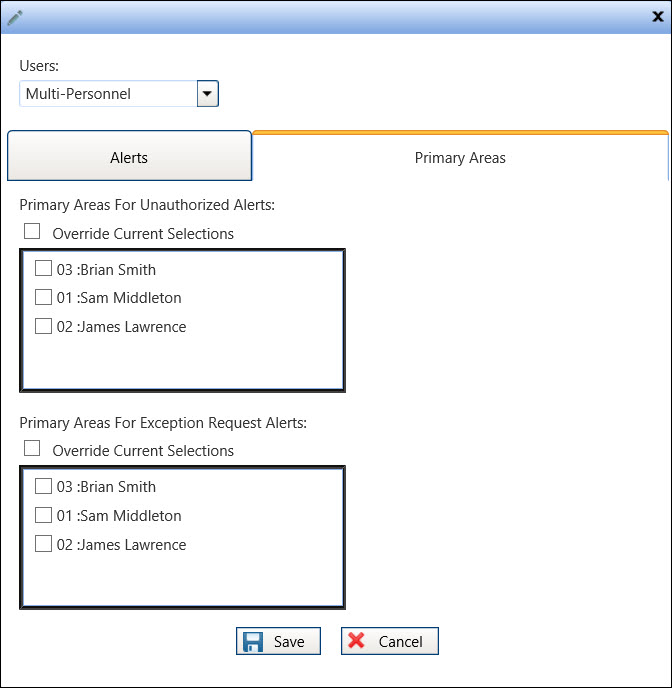
From
the Primary Areas for Authorized Alerts area, click the Override
Current Selections checkbox to override the users’ previous
area ID selections. Keep in mind that any unchecked area ID will be
removed if these area IDs were previously selected.
Select
one or more area IDs from the Primary
Areas for Authorized Alerts area.
From
the Primary Areas for Exception Request Alerts area, click the Override Current Selections checkbox
to override the users’ previous area ID selections. Keep in mind that
any unchecked area ID will be removed if these area IDs were previously
selected.
Select
one or more area IDs from the Primary
Areas for Exception Request Alerts area.
Click
the Save button to save the
selected users’ personal information from both tabs.


