Hover a mouse pointer over the Settings menu link on the menu bar to display its drop-down menu.
Slide a mouse pointer over to the Agreements option to display its menu.
Click Agreements to
open the Agreement screen.

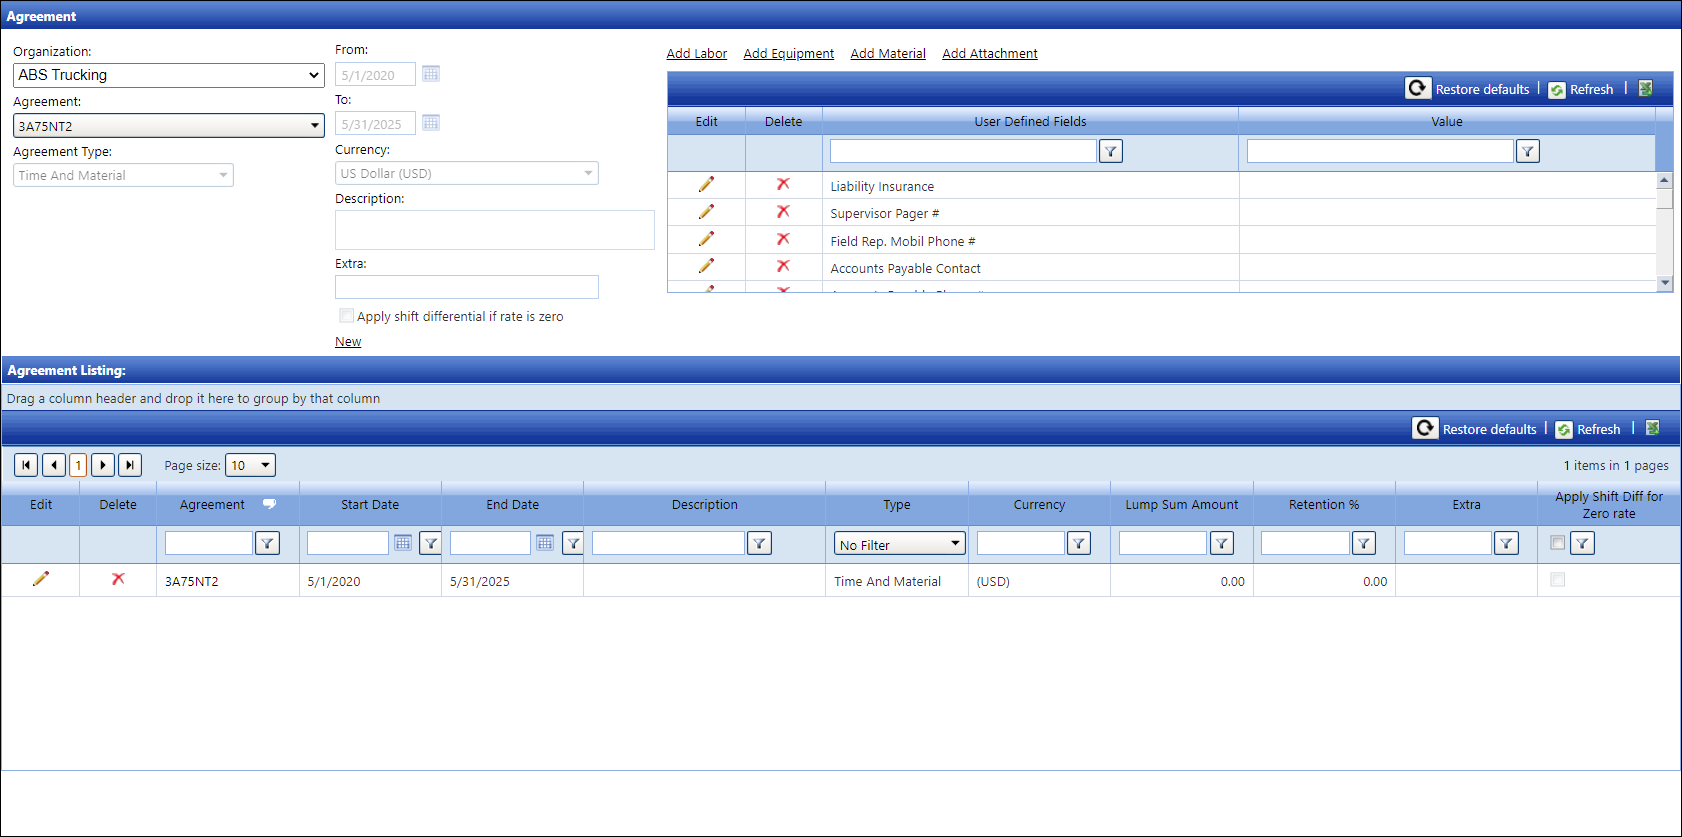
Agreements are set up for time and materials, unit price, or lump sum to reflect an agreement between an owner and a contracting company. From the Agreement screen, click Add Labor, Add Equipment, or Add Material to open its screen where labor resources, equipment, and materials can be added to the selected agreement.
Track provides the ability to attach a document to an Agreement. The attachment can also be viewed from Authorization Central (Invoices > Authorization Central > Central) and Express Central (Invoices > Authorization Central > Express Central)
Hover a mouse pointer over the Settings menu link on the menu bar to display its drop-down menu.
Slide a mouse pointer over to the Agreements option to display its menu.
Click Agreements to
open the Agreement screen.

If applicable, select a location from the Location drop-down list located on the menu bar.
From the Agreement screen, select an organization from the Organization drop-down list.
Click New to enable text boxes and drop-down lists. The User-Defined Fields area disappears.
Enter a new agreement name into the Agreement text box.
Select an agreement type from the Agreement Type drop-down list.
If the Lump Sum option is selected from the Agreement Type drop-down list, then enter the lump sum amount into the Lump Sum Amount text box. If applicable, enter the retention percentage into the Retention % text box.
Enter the agreement dates into the From and To text boxes. Alternatively, select the dates from the calendars. (see also Date Format)
Select a currency from the Currency drop-down list, if applicable.
Enter a new agreement's description into the Description text box, if applicable.
Enter additional information into the Extra text box, if applicable.
If shift differential rates are to apply for this agreement when a skill base rate is zero, click the Apply shift differential if rate is zero checkbox.
If applicable, click Add Attachment then select and upload a document related to an agreement.
Click Add to save and display the new agreement in the Agreement Listing. The User-Defined Fields area reappears.
The agreement name and type cannot be edited.
From the Agreement Listing, click the Edit icon on a line item to enable the Calendar and Description text boxes and the Currency drop-down list.
Make the changes where applicable.
If the agreement has the defined rate for the shift differential, deselect the Apply shift differential if rate is zero checkbox.
If a document needs to be updated, click Add Attachment then upload a new document.
Click the Update icon to save the modifications.
An agreement cannot be deleted if it is in used.
From the Agreement Listing, click the Delete icon on a line item. The delete confirmation pop-up message appears.
Click OK to delete the selected agreement.
Disclaimer: Do not include any personally identifiable information or personal data when entering information into the User Defined Field's Value text boxes. Management Controls, INC. (MCi) cannot be held responsible for any information in the User Defined Field's Value text boxes on any Track screens.
From the Agreement screen, select an organization from the Organization drop-down list.
Select an agreement from the Agreement
drop-down list to enable the User-Defined Fields area. If the selected
agreement already has user-defined information, they will be displayed
in the grid.

From the User-Defined Fields area, click the Edit icon on a line item to enable the Value text box.
Enter or edit the selected agreement's user-defined information in the Value text box.
Click the Update icon to save and display the new or modified user-defined information in the grid.
From the User-Defined Fields area, click the Delete icon on a line item. The delete confirmation pop-up message appears.
Click OK to delete selected agreement user-defined information.
From the Agreement Listing, click an Agreement link to display the selected agreement in a PDF format. If an agreement PDF file is not linked to the selected agreement, the pop-up dialog box displays, "Contract PDF does not exist for this agreement."
Click OK to close the pop-up message and return to the Agreement screen.