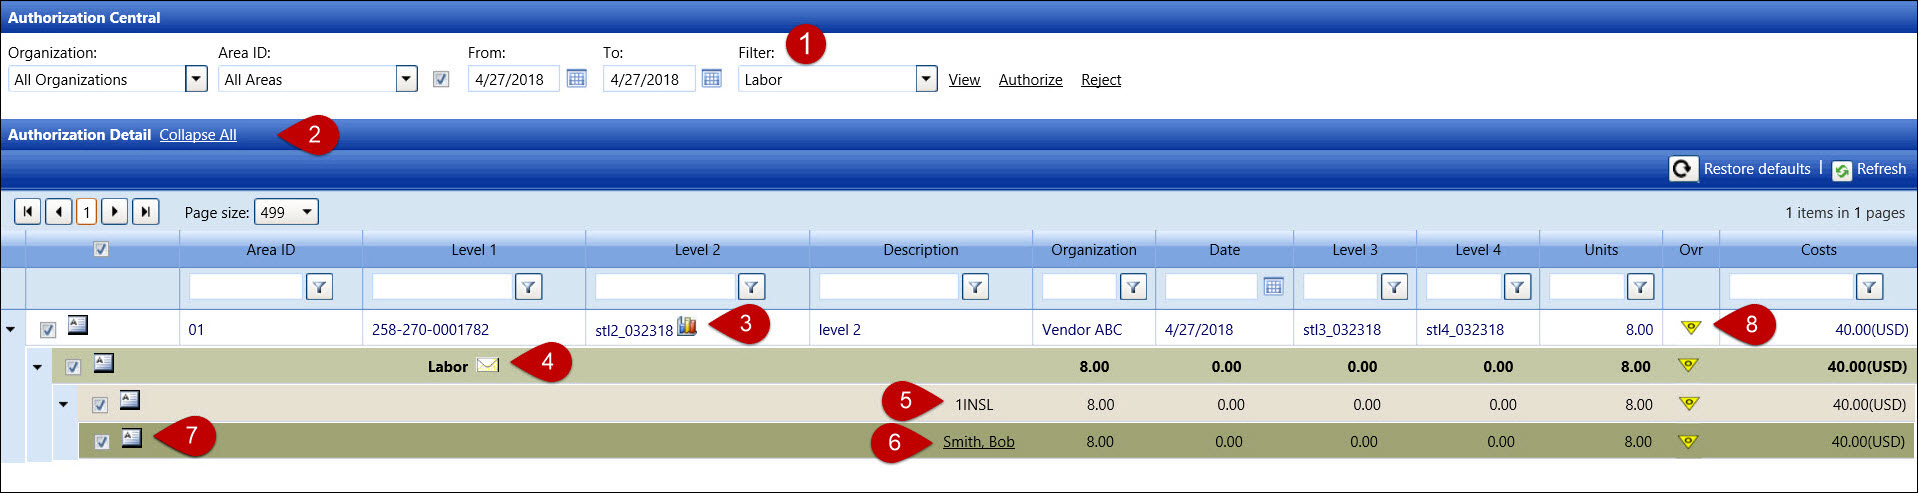
When the Labor option is selected from the Filter drop-down list, the labor items are displayed in the Authorization Detail grid.
Once the Expand All link is selected, all line items expand and display the details.
Hover a mouse pointer over the Bar
Graph icon  to reveal the hover box, displaying
the estimated and authorized costs.
to reveal the hover box, displaying
the estimated and authorized costs.
Click the Send Mail
icon  to open the dialog box where an e-mail is drafted and sent to a selected
Track user. The e-mail message will appear on Track Home page as Track
internal message.
to open the dialog box where an e-mail is drafted and sent to a selected
Track user. The e-mail message will appear on Track Home page as Track
internal message.
A summary of hours and costs are displayed. The summary continues as Labor is expanded by skill and then by resources. The hours are listed in order as Straight Time Hours, Overtime Hours, Double-Time Hours, and Extra Charges. If Rates 4, 5, and 6 are being used, they will appear under the Straight, Overtime, and Double Time hours.
Each line item displays a labor's name and his allocated hours and extra charges.
Click the Rejected Time Comments
icon  to enable the text box for rejected comment
entry. If the rejected comment is entered at the summary level, all
items included in that summary will have the same rejected comment.
For example, if the rejected comment is on the Labor level or selected
labor skill level, then the same comment applies to all labor resources
listed below. Add a rejected comment for each labor by clicking the
Rejected Time Comments icon
on each line item to enable a text box for rejected comment entry.
Refer to View the rejected comment for
labor for more information.
to enable the text box for rejected comment
entry. If the rejected comment is entered at the summary level, all
items included in that summary will have the same rejected comment.
For example, if the rejected comment is on the Labor level or selected
labor skill level, then the same comment applies to all labor resources
listed below. Add a rejected comment for each labor by clicking the
Rejected Time Comments icon
on each line item to enable a text box for rejected comment entry.
Refer to View the rejected comment for
labor for more information.
If there is an override, the Override
icon  is displayed in the summary line as well as the detail lines. Click
the Override icon to expand
or collapse the line items. Click the Override
icon on the selected labor line item to open the Pay Detail dialog
box. Refer to Understand Labor Detail
Dialog Box for more information.
is displayed in the summary line as well as the detail lines. Click
the Override icon to expand
or collapse the line items. Click the Override
icon on the selected labor line item to open the Pay Detail dialog
box. Refer to Understand Labor Detail
Dialog Box for more information.