Hover a mouse pointer over the Allocations menu link to display its drop-down menu.
Slide a mouse pointer over to the Allocations to display its menu.
Click the Labor Manual Hours
to open the Manual Time Entry and Allocation screen.
When all selected labor resources have worked the same hours and jobs (cost objects), the group entry allows timekeepers (or foreman) to enter their hours and allocations on a single screen.
Hover a mouse pointer over the Allocations menu link to display its drop-down menu.
Slide a mouse pointer over to the Allocations to display its menu.
Click the Labor Manual Hours
to open the Manual Time Entry and Allocation screen.
If the hours have been allocated and are ready for acceptance, the asterisks appear next to the labor resources.
If applicable, select a location from the Location drop-down list located at the menu bar.
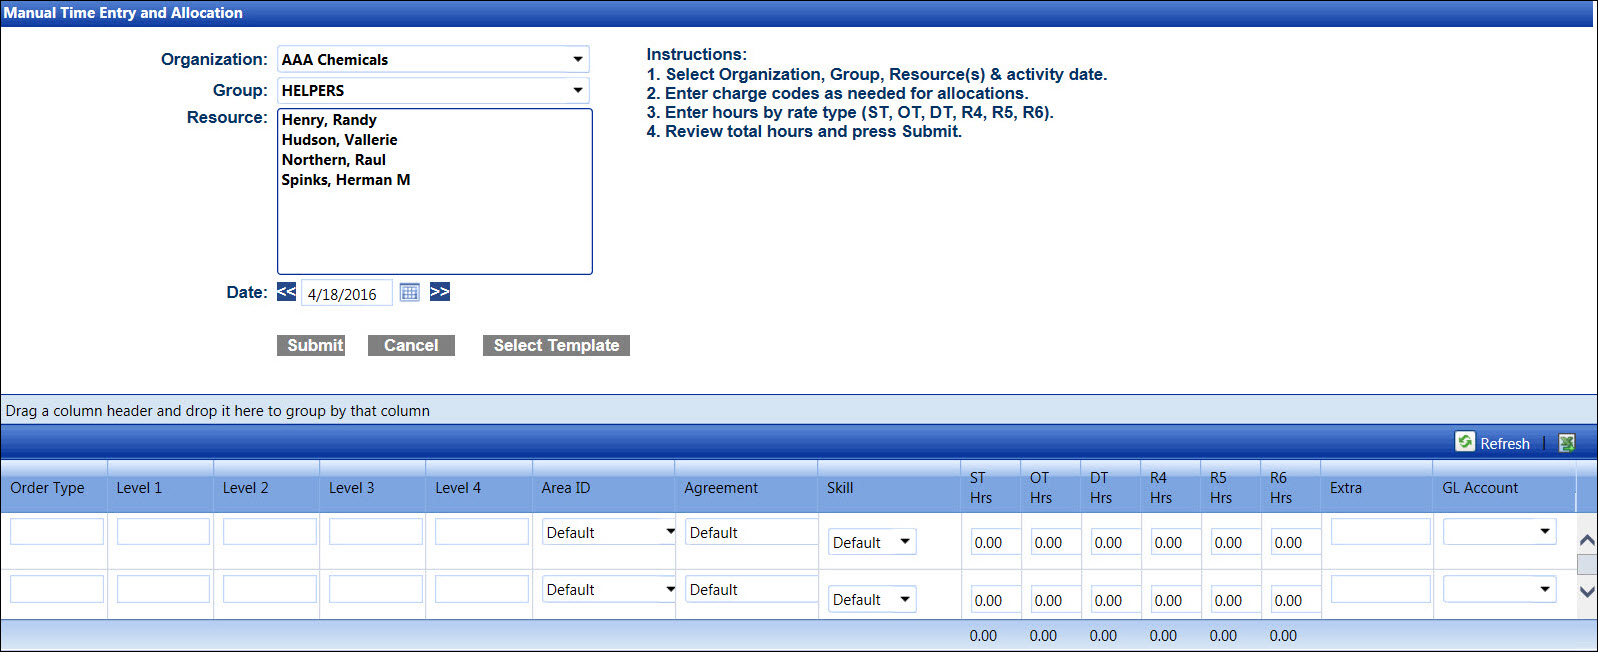
From the Manual Time Entry and Allocation screen, select an organization from the Organization drop-down list.
The All Groups option in the Group drop-down list is selected by default. Select a specific labor group from the Group drop-down list to display its labor resources in the Resource list box.
Enter the event's date into the Date text box. Alternatively, click the double arrows icon to move a date forward or backward one day, or select a date from the calendar. (see also Date Format)
Select group of labor resources from the Resource list box, using the Control or Shift key control. (see also Control and Shift Keys)
From the grid, enter the order type into the Order Type text box.
Enter the cost object information into the appropriate text boxes.
The Default option in the Area ID, Agreement, and Skill drop-down list are selected by default. If applicable, select an area ID from the Area ID drop-down list, an agreement from the Agreement drop-down list, and a skill from the Skill drop-down list.
Enter the time into the ST Hrs, OT Hrs, DT Hrs text boxes and the other defined hours into the R4 Hrs, R5 Hrs, and R6 Hrs text boxes.
Enter additional information into the Extra text box, if applicable.
Select the GL account from the GL Account drop-down list, if applicable.
Click the Submit button to save and apply the information to the selected labor resources.